

Post by Danimal on Dec 13, 2009 1:04:17 GMT -5
Be careful, don't go dropping gearboxes or Justys on yourselves please.
To remove the gearbox:
Disconnect the battery.
Remove the air cleaner assembly.
Raise and safely support the Justy.
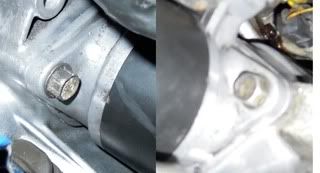
Disconnect the electrics from the starter and then the starter motor itself which is held in place by two bolts that go through the transmission and screw into the engine block:
Remove the other electrics from the transmission: ground wire, connector to the radiator fan, et cetera.
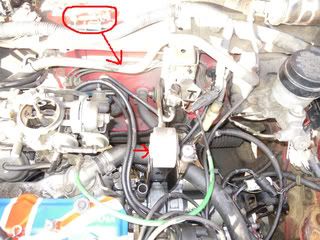
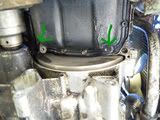
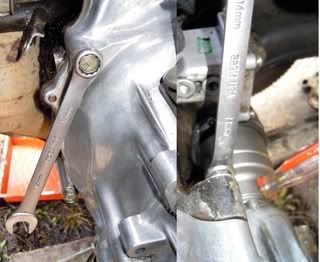
Disconnect the speedometer cable and vacuum lines to the 4X4 actuator(speedo indicated by the arrow, actuator indicated by circle(?)):
Remove the clutch cable.
Remove the wire from the coil to the distributor(it's in the way if you are going to lift the gearbox up and out).
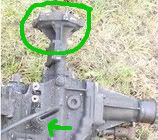
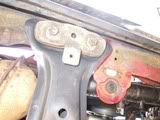
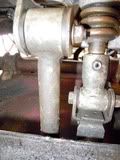
Remove the Pitch stopper:
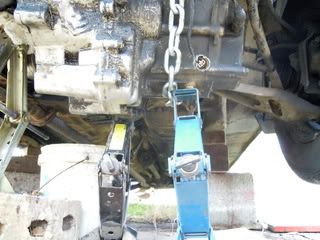
Secure the gearbox lifting device.
Remove the undercarriage.
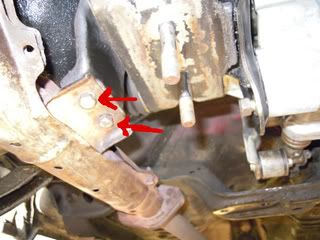
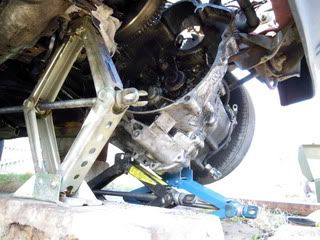
Remove the crossmember(two bolts in the front, two in the back and two mountain nuts in the middle):
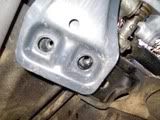

Remove the lower engine mount, three bolts hold the gearbox to the mount:
Two bolts hold the exhaust to the mount:
I don't think one needs to remove the mount completely but I like to have better view of what I'm working on and get all the parts nice and clean before I re-install them. The same can be said of the flywheel cover(be very careful if you remove and clean this because it has some foam seals that dry-rot easily if they get oily), two small bolts hold it in place:

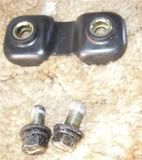
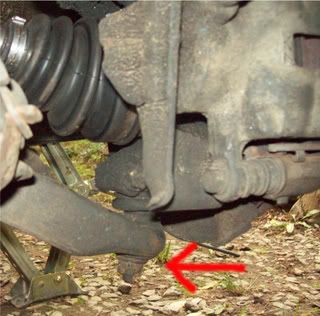
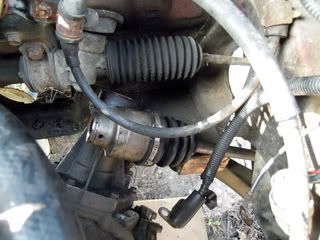
Remove the halfshaft to driveshaft spring pins and separate the the axle and driveshafts:

Remove just the lower ball joint cotter pin and castle nut on the transmission side of the car and the halfshaft will come free of the driveshaft as the wheel lifts out and away from the car:
Once the pin has been removed from the other side you can wait untill the transmission is free from the engine and slide the driveshaft out of the halfshaft as the transmission is pulled.
Remove the transmission mounting bracket(at rear near gearshift linkage).
Disconnect the gearshift rod and stay:
Remove the propeller shaft from the rear of the transmission.
Safely support the engine.
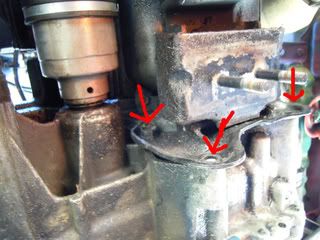
Remove the two transmission-to-engine bolts on the exhaust side of the engine and the one engine-to-transmission bolt on the opposite side directly above the driveshaft(there is a bracket above this to remove also):
Separate the transmission from the engine(it will still be hanging on by the pegs) and lift it from the Justy.
I dropped my gearbox out of the bottom by letingtwo jacks down slowly and repositioning them as necessary to keep them under the centre of gravity.
I also removed the valve that allows fresh air to the second catalytic converter in order to let the 4X4 actuator(?) swing up as the transmission twisted out. A little jiggery-pokery and it's not too bad of a one man job.
The halfshaft propped nicely out of the way.
One could spin it farther and not have to bring the back end so far to the side. Just the way I let the jacks down.
Please note!:
Not all of the pictures are showing a 4X4 gearbox! I took some of the pictures during the install of a FWD gearbox. The talking points still match the 4WD procedure for removal.
Of course, continue on this thread with your own helpful hints or tips or anything.
I'll find a few more pictures later.
-Danimal
To remove the gearbox:
Disconnect the battery.
Remove the air cleaner assembly.
Raise and safely support the Justy.
Disconnect the electrics from the starter and then the starter motor itself which is held in place by two bolts that go through the transmission and screw into the engine block:
Remove the other electrics from the transmission: ground wire, connector to the radiator fan, et cetera.
Disconnect the speedometer cable and vacuum lines to the 4X4 actuator(speedo indicated by the arrow, actuator indicated by circle(?)):
Remove the clutch cable.
Remove the wire from the coil to the distributor(it's in the way if you are going to lift the gearbox up and out).
Remove the Pitch stopper:
Secure the gearbox lifting device.
Remove the undercarriage.
Remove the crossmember(two bolts in the front, two in the back and two mountain nuts in the middle):
Remove the lower engine mount, three bolts hold the gearbox to the mount:
Two bolts hold the exhaust to the mount:
I don't think one needs to remove the mount completely but I like to have better view of what I'm working on and get all the parts nice and clean before I re-install them. The same can be said of the flywheel cover(be very careful if you remove and clean this because it has some foam seals that dry-rot easily if they get oily), two small bolts hold it in place:
Remove the halfshaft to driveshaft spring pins and separate the the axle and driveshafts:
Remove just the lower ball joint cotter pin and castle nut on the transmission side of the car and the halfshaft will come free of the driveshaft as the wheel lifts out and away from the car:
Once the pin has been removed from the other side you can wait untill the transmission is free from the engine and slide the driveshaft out of the halfshaft as the transmission is pulled.
Remove the transmission mounting bracket(at rear near gearshift linkage).
Disconnect the gearshift rod and stay:
Remove the propeller shaft from the rear of the transmission.
Safely support the engine.
Remove the two transmission-to-engine bolts on the exhaust side of the engine and the one engine-to-transmission bolt on the opposite side directly above the driveshaft(there is a bracket above this to remove also):
Separate the transmission from the engine(it will still be hanging on by the pegs) and lift it from the Justy.
I dropped my gearbox out of the bottom by letingtwo jacks down slowly and repositioning them as necessary to keep them under the centre of gravity.
I also removed the valve that allows fresh air to the second catalytic converter in order to let the 4X4 actuator(?) swing up as the transmission twisted out. A little jiggery-pokery and it's not too bad of a one man job.
The halfshaft propped nicely out of the way.
One could spin it farther and not have to bring the back end so far to the side. Just the way I let the jacks down.
Please note!:
Not all of the pictures are showing a 4X4 gearbox! I took some of the pictures during the install of a FWD gearbox. The talking points still match the 4WD procedure for removal.
Of course, continue on this thread with your own helpful hints or tips or anything.
I'll find a few more pictures later.
-Danimal


 Is your car an ecvt?