|
|
Post by imaginarius on Jan 18, 2010 16:33:15 GMT -5
I can't find where to start a new guide *up there, so I will start it here and if someone can move it, that would be very cool. This is how I am going to clean the windshield wiper fluid assembly. 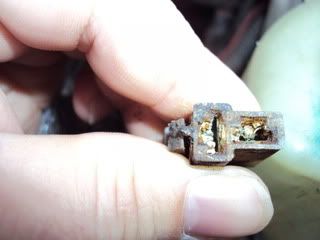 So anyways, I finally got another camera and opened the hood, unplugged the line from the unit, and this is what I saw... 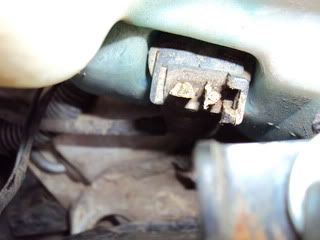 I suppose I should have brought a few tools, but later this afternoon I'll go home on my break and grab a wrench, because to get deeper into this, I need to remove the whole unit, plus I need to figure out how to get those sprayers safely off the hood. So, more later! |
|
SeattleJusty
 No, a boxer will not fit in a Justy.
Posts: 1,587
|
Post by SeattleJusty on Jan 18, 2010 23:17:45 GMT -5
Do you have any larger photos?
|
|
|
|
Post by imaginarius on Jan 19, 2010 0:07:12 GMT -5
Oh, yeah I know. Still not sure about how to fix that, but I am sure there is more important things on this forum to do then worry about photo sizes.
|
|
SeattleJusty
No, a boxer will not fit in a Justy.
Posts: 1,587
|
Post by SeattleJusty on Jan 19, 2010 11:46:12 GMT -5
Oh, yeah I know. Still not sure about how to fix that, but I am sure there is more important things on this forum to do then worry about photo sizes. Open them using MS Paint and use stretch skew to reduce the size. At first, just try 50%/50% and work up or down from there. Then resave and there'ya'have it. I remember other trheads where there are huge pix and the trouble becomes when someone quotes you and then you have quotes with giant pix. Gets reaalllly difficult to read a trhead that way even after one post with giant threads. . . near intollerable with multiples. |
|
Danimal
 Getting my two Justys back together after a Justy hiatus.
Posts: 589 
|
Post by Danimal on Jan 19, 2010 12:26:54 GMT -5
Open them using MS Paint and use stretch skew to reduce the size. At first, just try 50%/50% and work up or down from there. Then resave and there'ya'have it. It is even easier than that. Since you have already uploaded to photobucket just log in and click on the picture that you want and above it ought to be some editing options. One option is size, selected medium and then save it that way. You wont even have to edit your post with a new picture code.  Dan§imal |
|
|
|
Post by RedRooJusty on Jan 19, 2010 16:40:03 GMT -5
Jim, I don't mean to criticize but, I am unclear as to what subject you are doing a "Guide" covering. Looks like the windshield sprayer pump motor connection. I found the subject two sentences in. A solid guide has a basic structure: 1. Subject with goal statement. 2. Brief history of problem including diagnosis / symptoms. 3. Disassembly + reassembly pictorial with step by step notation. 4. Outcome and cost. Like I said, I am not meaning this to be critical, I just push for clear and concise guides. Pretend you are describing this to people with technical skills who may have never done this repair before. I prefer the larger images for detail, but the comments of reducing picture size make sense for readability. -keep up the good work friend, looks like you are killing your "..NEED to do..." list  . subarujusty.proboards.com/index.cgi?board=everything&action=display&thread=3140 -RRJ |
|
|
|
Post by imaginarius on Jan 19, 2010 17:17:28 GMT -5
Oh my god...yeah, it's a big one, but I gotta start somewhere. Ok, I will break down that list.
1. Fix or replace the whole windshield wiper fluid system.(Already said that.)
2. (and I never ever thought I would have to repeat this)(since when I turn them on, the right won't work at all, and the left one is basically a male orgasm of blue fluid all over the windshield, a big jizz or 3 and then it dies off...)
3. Already started the picture process!
4. I am not sure at all how much this is gonna cost, who here has actually delved into the windshield wiper fluid crap? I mean, enough to make a first time, farcle it, whatever guide to figuring out the problem and solving it with as much pictorial detail(although I will cut down the size) and information about each pic. I do realize I could have done that better. But, sue me I'm a guide virgin! ;D
At 230pm, I am going back to the house to tear it apart, I think it's ok for right now to have the assembly out, right? I don't need the de-icer at this moment, but in case I do I have some in a spray bottle at all times.
|
|
|
|
Post by imaginarius on Jan 19, 2010 21:50:29 GMT -5
Alright guys, I got the size issue fixed, here is the next installment of pics. Not. Very. Interesting. Edit!!! Ok, I thought it worked itself out, bit PhotoBucket is being a jerk right now. Bear with me! Picture A. This is the removal of the outer rubber ring that seals(?) the nozzle to the car. I used a large safety pin to slip the point in and under the ring, with some help from needle-nose pliers, it was non-stressful. 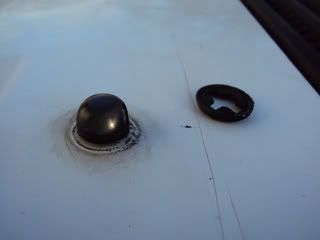 Picture B. This is the removal of the nozzle. For about 7 seconds, I was wondering why there was such resistance, but it was just the rubber hose still attached to it. There are small tabs on each side of each nozzle, so be careful about how rough you wanna do it. When my fingers weren't doing it, I used regular pliers, which although it put small dents in the nozzle, it was safe enough to wriggle it out. 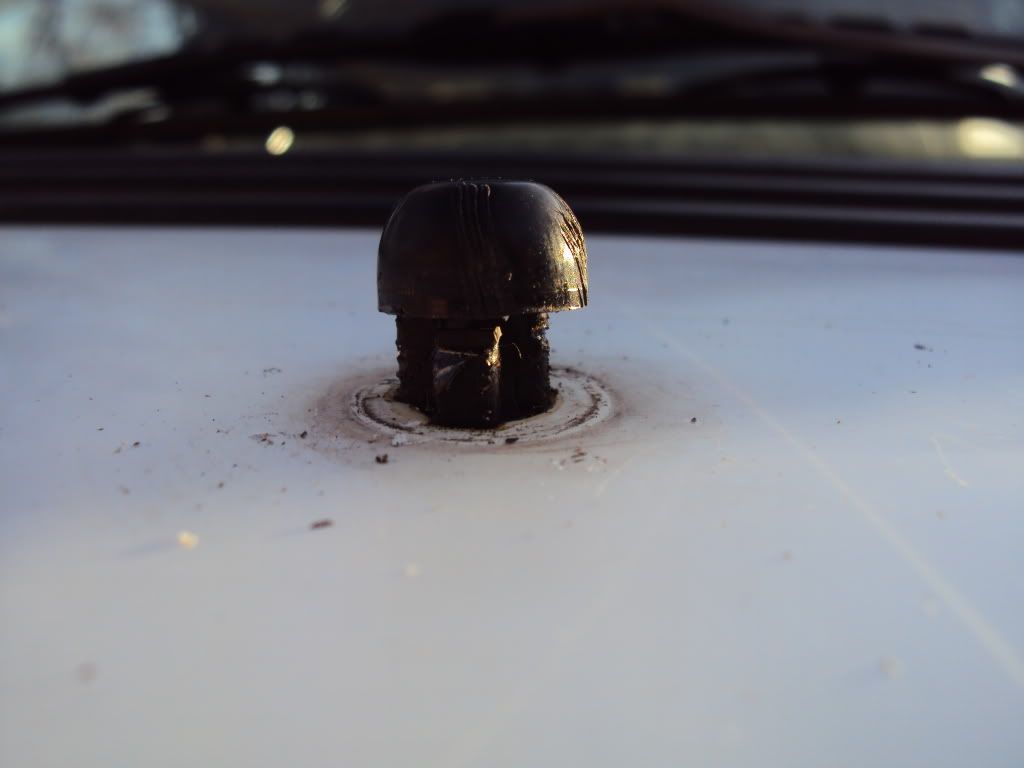 Now here is the not so interesting part. I am going to soak them for a few hours, while I am here at work. I made a water/vinegar solution, and tonight I will scrounge for something small(and safe) enough to scrape out any dirt and funk in them. Any suggestions? 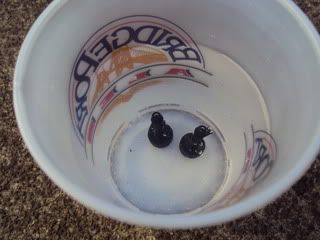 Thanks guys! Tomorrow I will put them on, I mean in daylight. Garage door is broken, so I can't exactly do work in the comfort of my dungeon... |
|


 .
.
 Is your car an ecvt?