|
|
Post by jradsan on Jul 27, 2009 13:08:35 GMT -5
More progress!!! This weekend i was able to get some work done on the 88 and also picked up an 89 4wd for some parts and so that it didnt have to go to the scrap yard! I now have become on of the guys that own more than one justy!!! The justy that i bought belonged to LongBeachJusty. I was rather sad when i was driving away with his car because it felt that i was stealing his child. His Loss my gain i guess. Betweeen Saturday and Sunday I was able to work on stripping the interior out and started with sound deadening the entire car.  Dirty interior before cleaning  So much dirt behind the rear panels. i was shocked at how much i got out with the shop vac  Floor in great shape, with carpet pulled up. 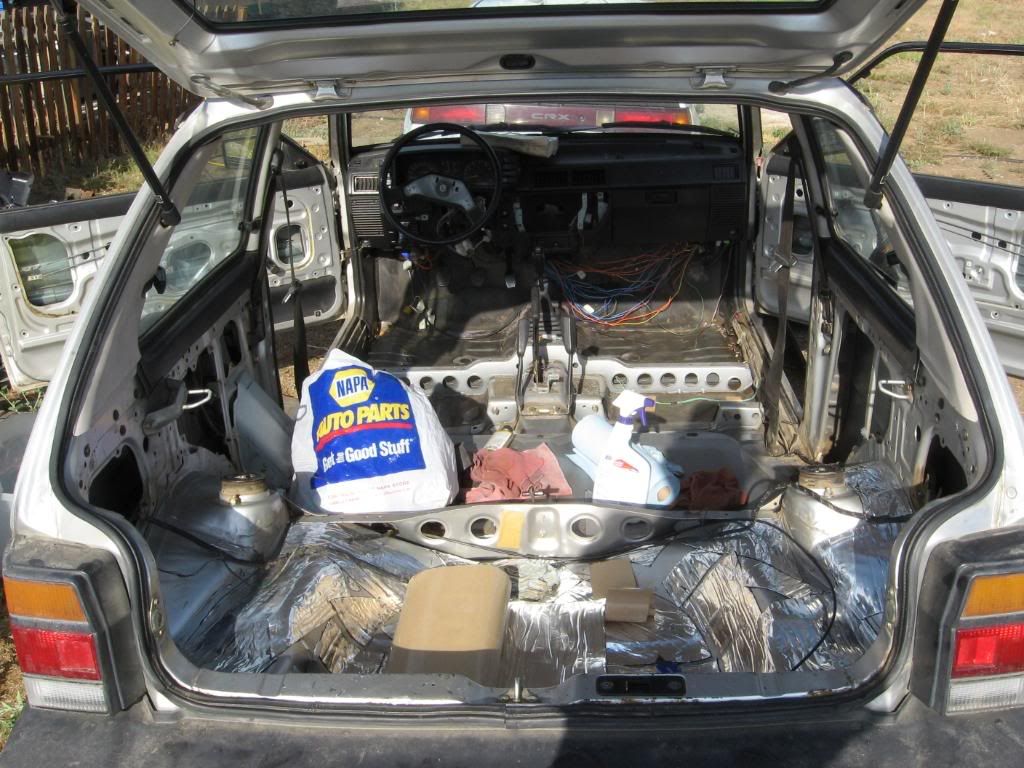 Trunk almost done! still added more to the wheelwells  Finished floor  Small amount of work on the exterior walls.  the View out the back of the car! not too shabby! So far i have 10 hours in with removal of interior, cleaning and most of floor done. i still need to go back and do more in some spots and then cover everything with the Ensolite Foam. There is lots left to do but i still am happy that i was able to make some head way! |
|
|
|
Post by eporter123 on Jul 28, 2009 1:46:04 GMT -5
Nice work! Looks real clean & a great base to build on.
Someone on here did a power lock write-up. Seemed like the hardest part was drilling a new hole in the door for the power lock wiring. A long drill solved the problem. I think they didn't want to take the fenders off.
The worst rust on my Justy is the battery tray. I don't miss living in upstate NY and getting pelted by salt trucks!
One trick I've heard of for removing the factory soundproofing chunks on the floor is to use dry ice, let it sit, then hit with a hammer & repeat. Makes that goopy stuff nice & brittle. Some people say it is quieter if you get the new dampener onto as much of the factory metal as possible. Other people say some people are perfectionists with their cars.
I've been thinking of putting sound dampening on my Land Cruiser, but the Justy would be A LOT cheaper! I think it's way less than half the size.
|
|
|
|
Post by jradsan on Jul 28, 2009 10:23:04 GMT -5
eporter thanks for the feedback!
Iwasnt sure what to do about the old sound deadening so i left it for the most part. i only pulled up places that have peeled up and had gotten dirt and other junk between the material and the metal. I followed the how to that is on the products website and it didn't mention removing the old sound deadening so i left it. As for the cost of the materials, Rick at raamaudio gave me a really good deal on some stuff that i used for the floor only. in total i have one full roll of the BTX, 3 yards ensolite, and one can of spray foam. this is going to be more than enough for the justy! cant wait to finish her up and drive her around!
|
|
|
|
Post by jradsan on Aug 3, 2009 12:44:22 GMT -5
more pictures of the sound deadening! got all the floor done which is nice cause i was able to reinstall most of the interior!    This foam is a really great product and was rather easy to install. Took some time but i am really happy with the results. Now i just need to do the firewall and the doors! |
|
|
|
Post by Justy4x4 on Aug 3, 2009 13:25:22 GMT -5
Looking great! I did the same thing to my very first Justy and it really made a difference. The only area I didn't do was the firewall and it certainly could use it. You should be pleased with the results when its all finished.
|
|
|
|
Post by jintei on Aug 3, 2009 19:13:57 GMT -5
your justy is the same color as mine, i wish that nice work was being done to mine!  |
|
|
|
Post by jradsan on Aug 24, 2009 12:12:57 GMT -5
Update: Have been doing little odds and ends on the car while still scratching my head as to why the car still is having idle problems and check engine light problems. oh well will get that worked out soon. I have converted (or started the process) the rear seat belts from lap belts, or two point , to safer 3 point. some people didnt think that the Gen1 had the correct mounting holes for the 3 point system but i was happy to find out that there were the correct 15 mm bolt threads already in the column!  this is the sealbelt and the rear shelf in place. 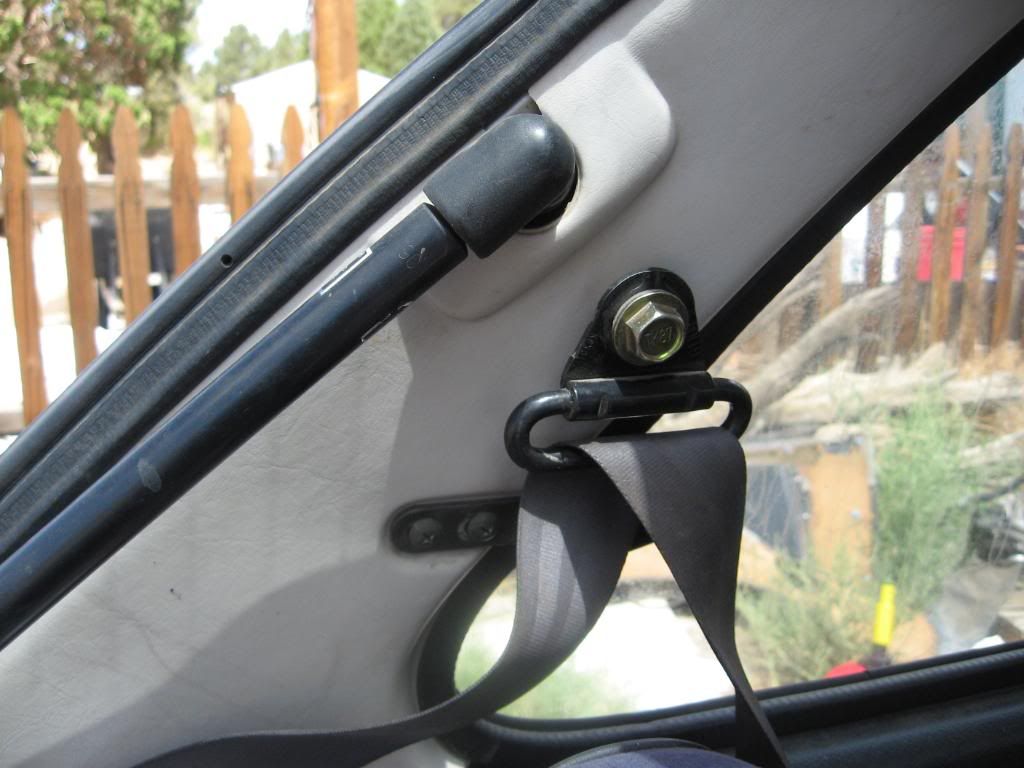 the seatbelt mount with moulding reinstalled.  all the bolt holes that are needed to mount the seatbelt housing and the shelf.  stock hole on the column for the mount. All that i had to do to make this change was to take off the interior moulding by removing the rubber seals for the hatch and the rear window, and slip it past the attachment for the lift strut. i then measured the size and location of the whole and marked and drilled the whole through the moulding. worked the first time! yay. i think it still looks stock and makes for a safer ride! the only problem is that the Gen2 shelves are not a perfect fit for the Gen1 car.  you can see here that it sticks out a small amount but the hatch still does close. I feel that they are better than nothing. I also plan on 'fixing' them with a dremel soon |
|
|
|
Post by jradsan on Jan 17, 2010 0:22:12 GMT -5
I am now at a place that i need help from some people that have a good knowledge of the trouble codes and what to do with them! I have just put in a new wire harness for my 88 4WD and i am getting a trouble code of 6, which is the 4wd California code but i am unsure of what this means for me. if anyone can help me figure this out i would be very appreciative!!
Jared
|
|
|
|
Post by jradsan on Jan 17, 2010 1:46:46 GMT -5
So.... there is another weird Electrical problem that i am having that is connected to the headlights. when i turn the main headlights on the number 2 fuse blew out! now when i turn them on without a fuse there is a buzzing noise from around the instrument panel. also the rear defogger light, both turn signals, and dash lights come on when the headlights are on. I am thinking that there could be a problem in a ground or a relay but i am not sure where i need to start looking. any advise would be great!! Thank You
Jared
|
|
Danimal
 Getting my two Justys back together after a Justy hiatus.
Posts: 589 
|
Post by Danimal on Jan 17, 2010 18:37:02 GMT -5
I am now at a place that i need help from some people that have a good knowledge of the trouble codes and what to do with them! I have just put in a new wire harness for my 88 4WD and i am getting a trouble code of 6, which is the 4wd California code but i am unsure of what this means for me. if anyone can help me figure this out i would be very appreciative!! This is the best information I can find about reading trouble codes: Okay, here goes. First you have to locate a few things. First your ECM, which is the main "computer". This is a metal box located under the left dash, you pretty much have to lie on the floor to see it I think. From what I remember it is about 3" by 4"? On this box there is a small led, you may not be able to see it when it is off, but it is pretty easy to see when it is on. This light is called the O2 monitor lamp (not sure why). This leads to the next things to look for, which are a couple of connectors hanging down around in that same area. This connectors are only hooked up for test/code reading purposes, so they should be hanging loose when you find them. One is called the Test Mode connector, and is green, two pins I believe. The second is the Read Memory connector, and is black, only a single pin. Okay, now to get the codes out. There's a couple of ways. First method, if the engine is running and the check engine light is on, if you look at the O2 light on the ECM, it should be blinking out a trouble code. More on how to interpret the flashes later. If the engine is running and the check engine light is off, connect the Read Memory connector. If there is a code in memory on the ECM, the check engine light should come on steady, and the O2 light should flash out a code. If there is no code in memory when you connect the Read Memory connector, then the check engine light should just start flashing, and the O2 light should remain off. I think it should actually work the same for reading the codes out if you just turn the ignition switch to on without actually starting the engine. The above process is referred to as the Read Memory mode in the manual. It also talks about the D-check mode which is basically the same as the above except you connect the Test Mode connector instead of the Read Memory connector. There is two differences though, with the first being that before the trouble code is read out, the vehicle specification code is flashed out. Even if there is no trouble code in memory, then only the vehicle specification code is flashed out. There are four vehicle specification codes, 01, 02, 05, and 06, which are (FWD, 49state and Canada),(FWD,California),(4WD,49state and Canada), and (4WD, California) respectively. One more thing before I explain how to read the blinking, if you want to clear the memory, connect both the Read Memory and Test Mode connectors at the same time. The blinking is converted to a code as follows. There are long flashes (1.2seconds) and short flashes (0.2 seconds). The long flash equals ten and the short flashes indicates one. The long flashes will be first, with one flash for ten, two for twenty, etc. These will be followed by a series of short flashes for the single units. Clear as mud? An example would help, three long flashes followed by four short flashes would equal 34. Make sense now? There will be about a two second delay and the code will be repeated, or if more then one code is present, all codes will be flashed out, then repeated. I hope that helps. when i turn the main headlights on the number 2 fuse blew out! now when i turn them on without a fuse there is a buzzing noise from around the instrument panel. also the rear defogger light, both turn signals, and dash lights come on when the headlights are on. I am thinking that there could be a problem in a ground or a relay but i am not sure where i need to start looking. any advise would be great!! Looks like you've done a fair bit of custom wiring...you may frind the problem by double checking all of your work. Perhaps pull the whole dash to best see whats going on. -Danimal |
|
|
|
Post by maddragon on May 17, 2011 22:59:53 GMT -5
Awesome work dude!
MADDRAGON
|
|
|
|
Post by streetman on May 18, 2011 14:07:50 GMT -5
keep on good work!
|
|
|
|
Post by jradsan on Dec 15, 2011 20:25:24 GMT -5
Been doing more work. Lots of progress. Need to snap some pictures and then I will get them up here! it has been way too long since i have made progress and been able to show it here! Hope to smog the car before the new year and drive it around in the snow! More soon
Jared
|
|
|
|
Post by Cañon Carver on Mar 25, 2012 22:02:29 GMT -5
This thread is great, very productive  I too am in the midst of a Justy rebuild. Hope to see more progress later on. -Jamie |
|
|
|
Post by doctormcgoveran on Mar 28, 2012 10:32:21 GMT -5
wow what a nice car! I can't tell from here but some of your electrical problems may be related to a stuck relay, or a bad switch. I generally have a huge battery and this is a fire hazzard because if the starter solenoid hung the starter would burst into flames before the battery quit spinning it, so I also run a ground interrupter terminal or switch in the ground wire and that way I can shut if off in emergencies and If I am going to park for a while, to protect from electrical gremlins and battery draining things like a brake like sticking on!!
|
|
|
|
Post by jradsan on Jan 27, 2014 16:38:54 GMT -5
So it seems that the forum isnt what it once was.... which makes me sad. there are so many people here that have been here for years helping people out and i wish that i was around more to help as well!
That being said i have been working on the justy and have made some serious progress with so much with the car. i really need to add some pictures so that you can see how great everything is going. The car still isn't smogged, but i had the carburetor rebuilt and it now runs really well at 8000 ft ! idles much better and runs strong. I am getting it closer and closer to being ready to try and pass smog. few more leaks to track down and exhaust to fix. i love having this 5 year old thread to keep posting to and showing what has been going on with this stupid little car! more information and pictures to come later!
|
|
|
|
Post by indkid87 on Jan 27, 2014 17:58:31 GMT -5
Welcome back! I too just came back to this um after a few years absence. It seems to be a much friendlier place now.
I look forward to seeing your progress, I know my car came a long way in the few years I was gone.
-Dave
|
|


 I too am in the midst of a Justy rebuild. Hope to see more progress later on.

 Is your car an ecvt?