|
|
Post by noll11 on Sept 20, 2018 10:37:41 GMT -5
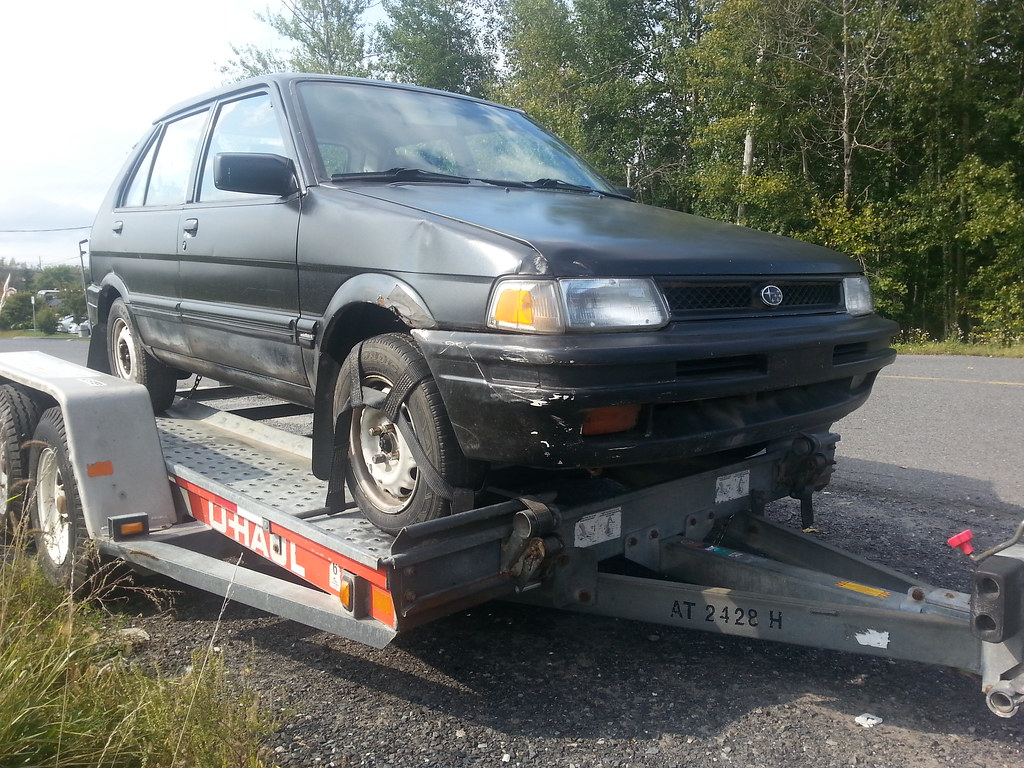
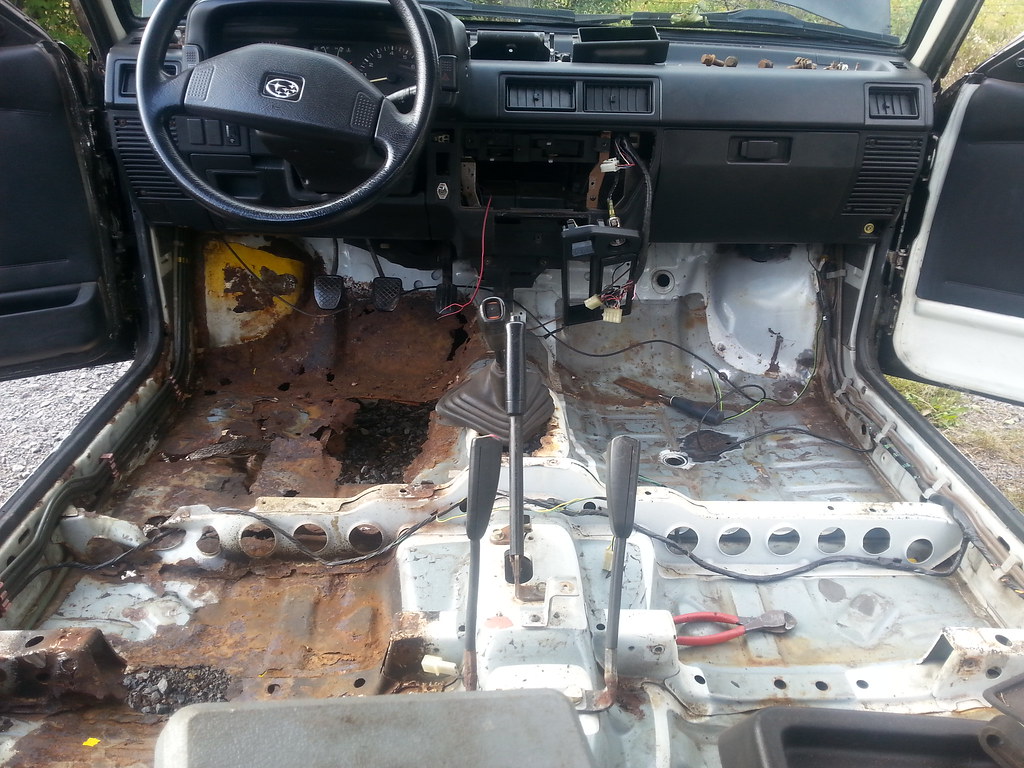
I found two Justys to purchase 2 years ago for the princely sum of 700$ for the pair, but they were too rusty to save. I decided to keep them around as future parts-cars for when I eventually found a Justy worth saving. Well, two years later, that time has finally come! I've been away for the past couple of months (driving around the world for charity), and found this Justy on Kijiji while I was away. It took the better part of a month to make it mine, due to wildly different time zones due to my trip and the seller preparing to move out of the country, but after returning last week, I drove 850km yesterday to tow it home.
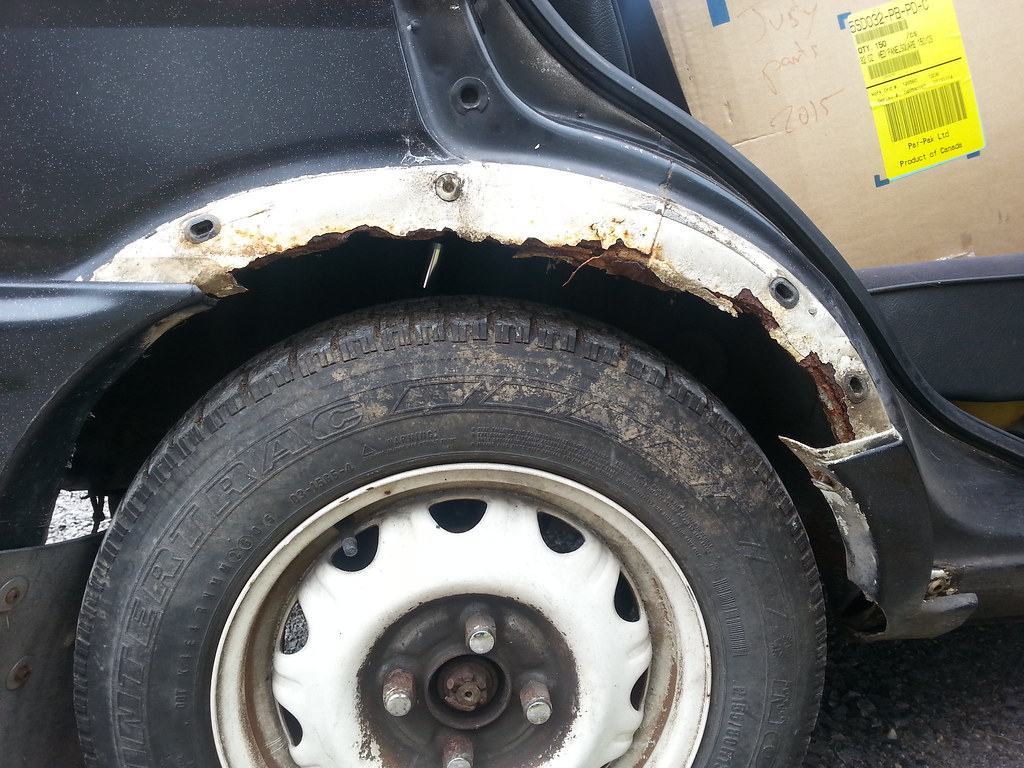
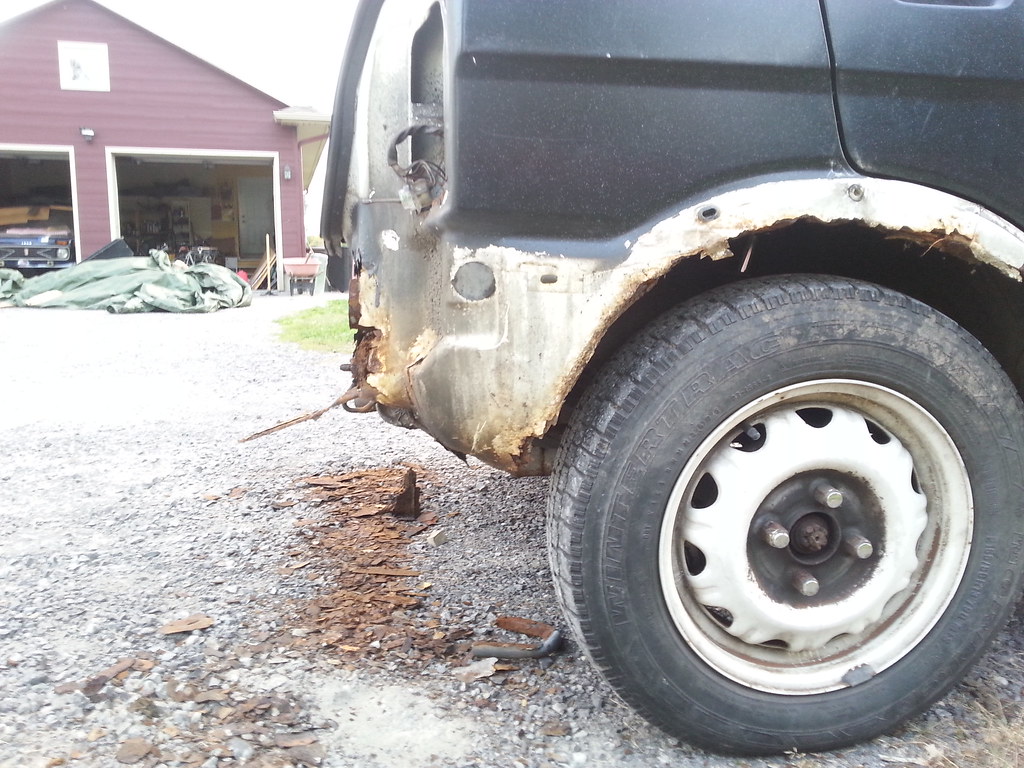
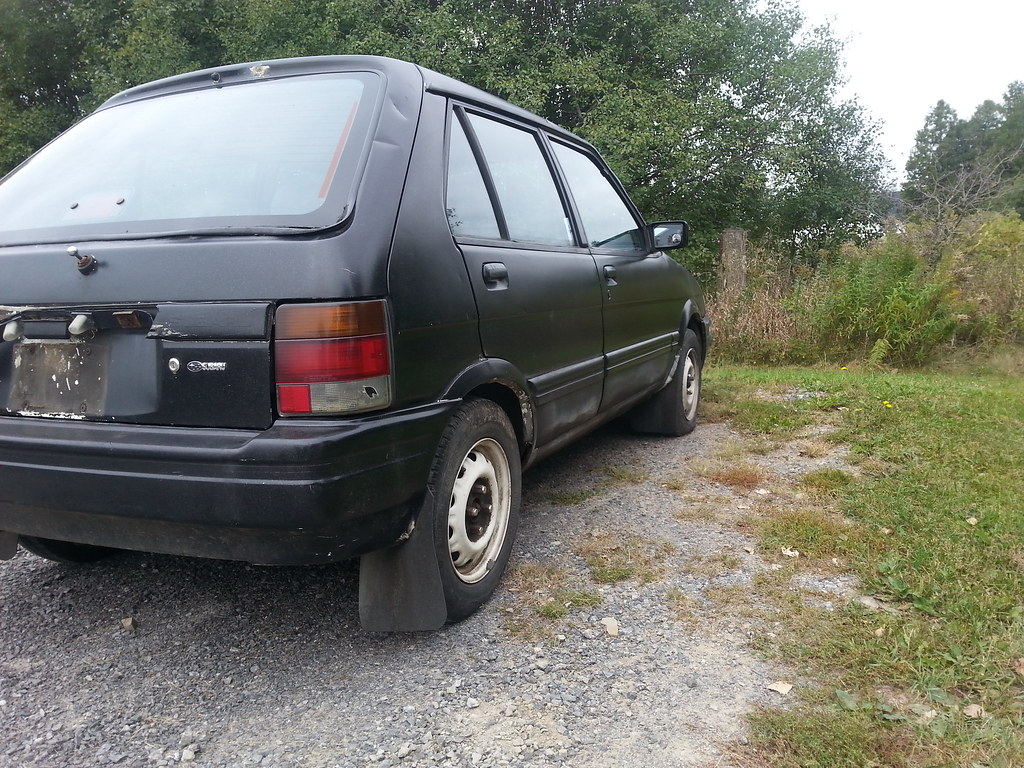
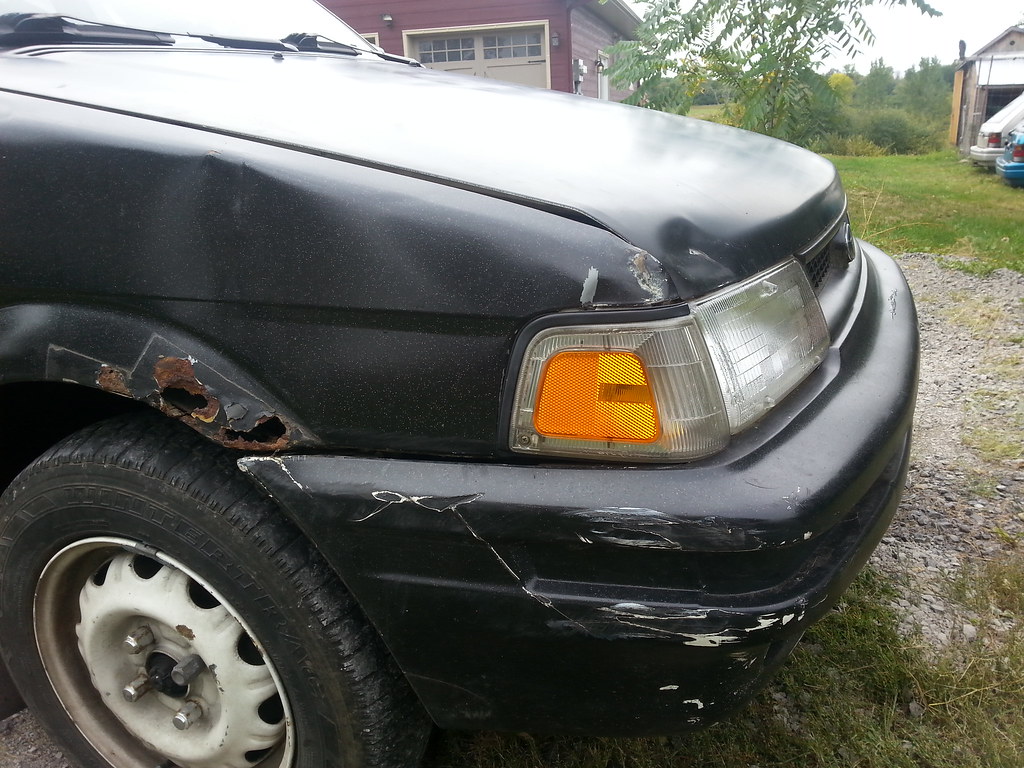
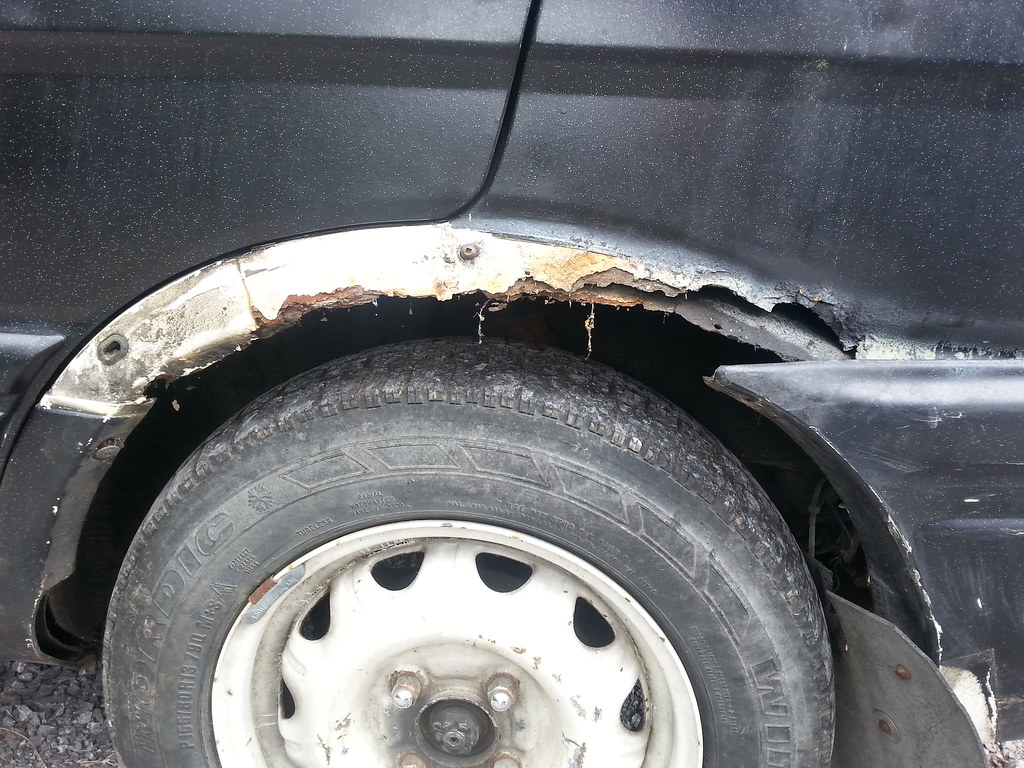
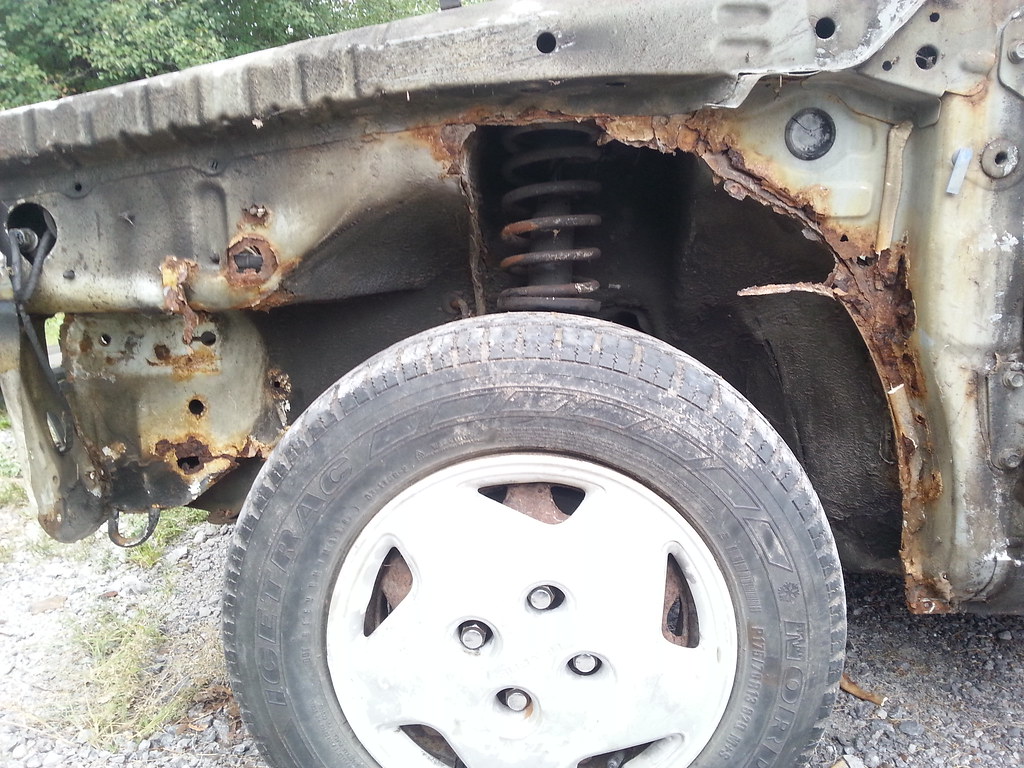
Unfortunately it has its share of dents and rust, but is still miles better then the other two I have, and is well worth saving. Main rust areas are the fenders, rear hatch, rear quarters, driver's floorpan, rear bumper area, and a couple small spots in the engine bay. 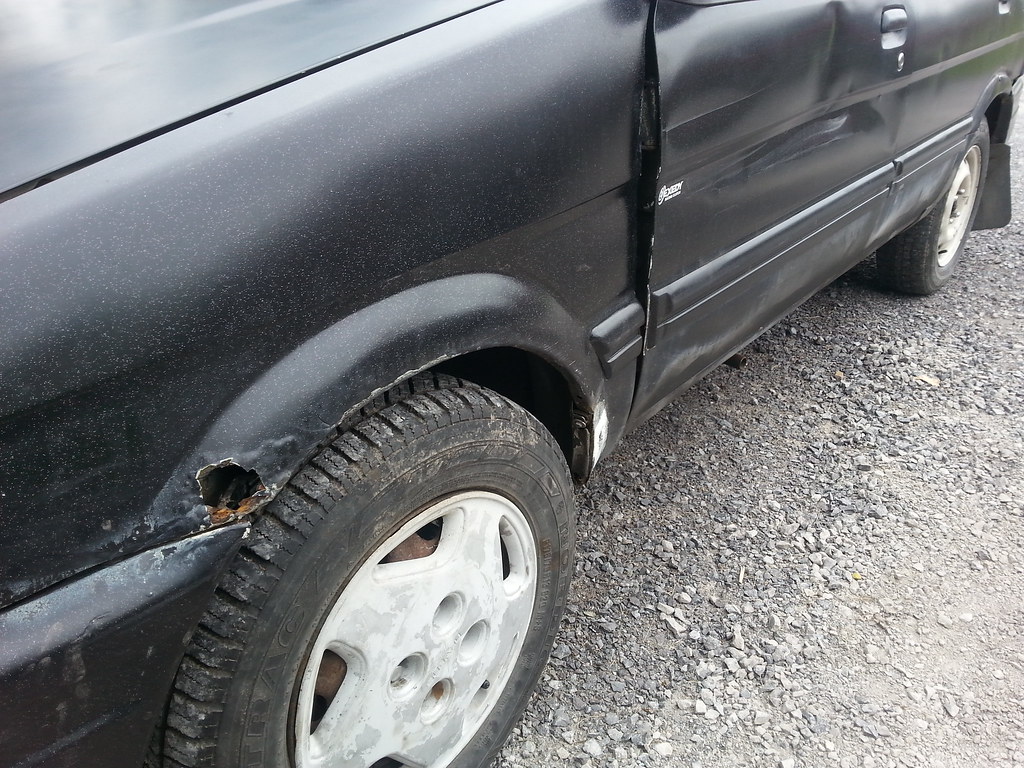
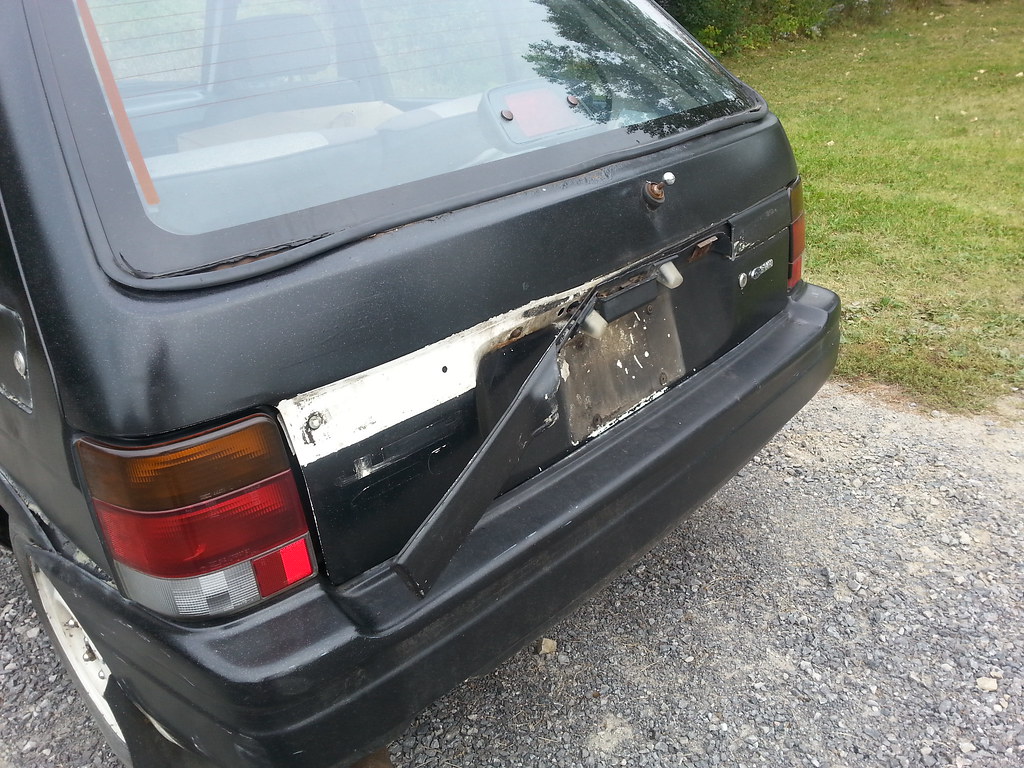
 The hatch is unfortunately pretty trashed and has rusted thru behind the weatherseal, but luckily I have a complete good-condition hatch I've been holding onto for the past 2 years.
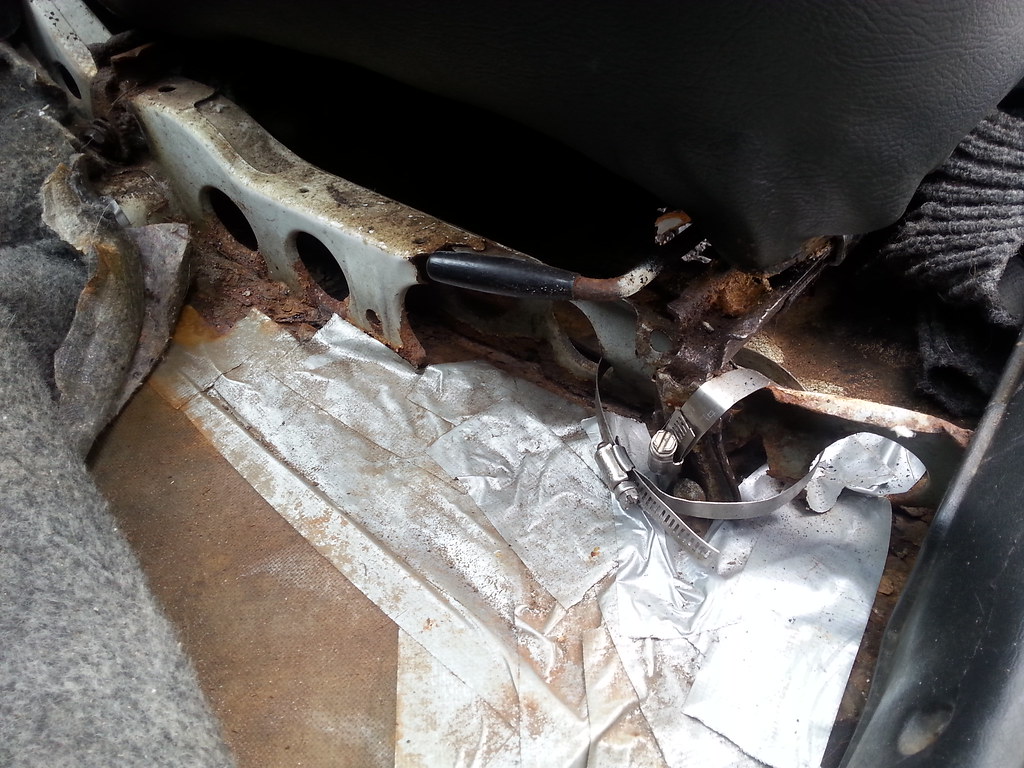
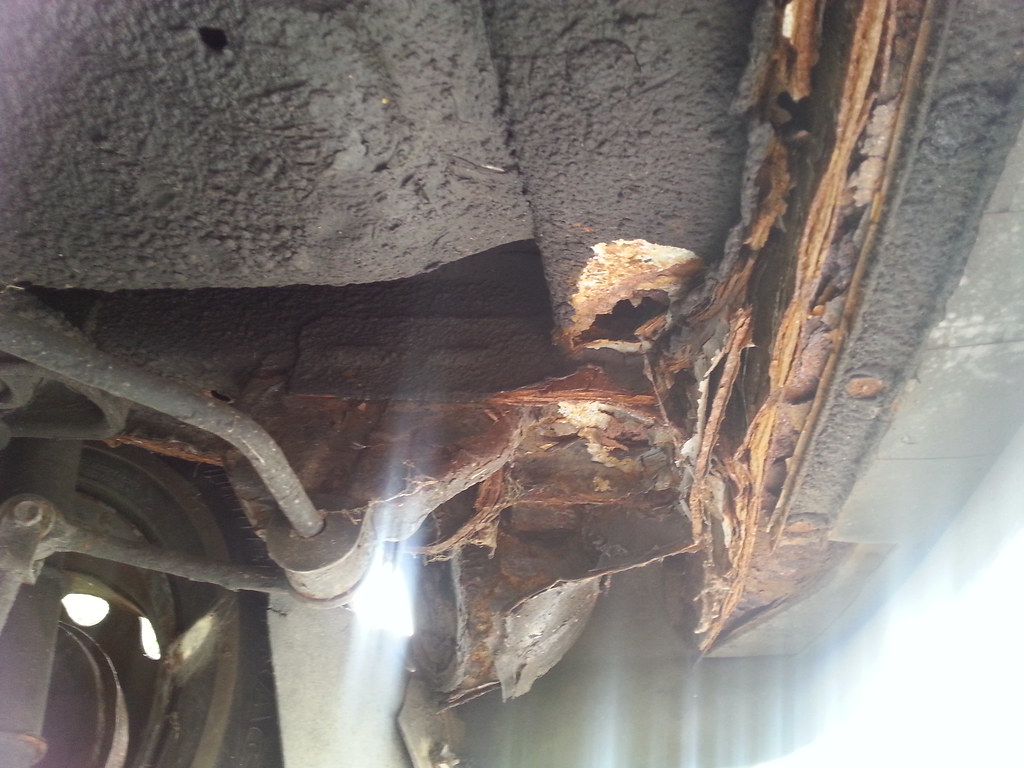
Rear quarter rust. Looks like wheel arch covers were put on to cover more rust, will need to dig into that and see how bad it really is. 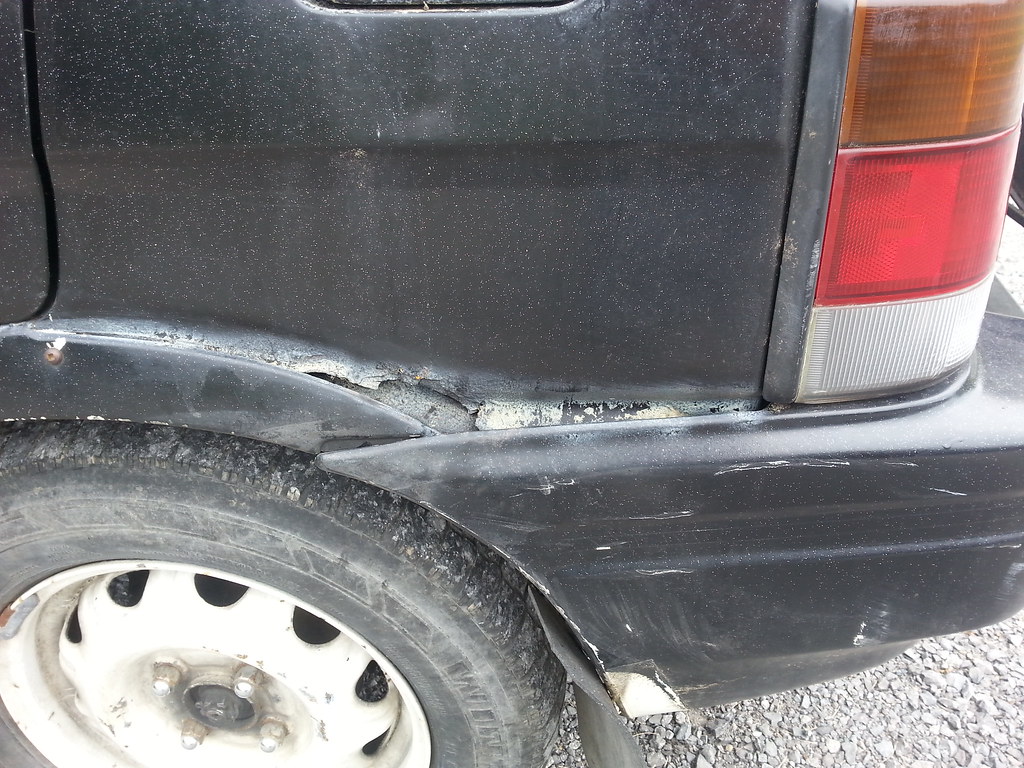 Not sure how the front seat mount got this bad. Probably just going to drill out the spot welds and weld in one of the mounts from my parts-cars if they're in OK shape.
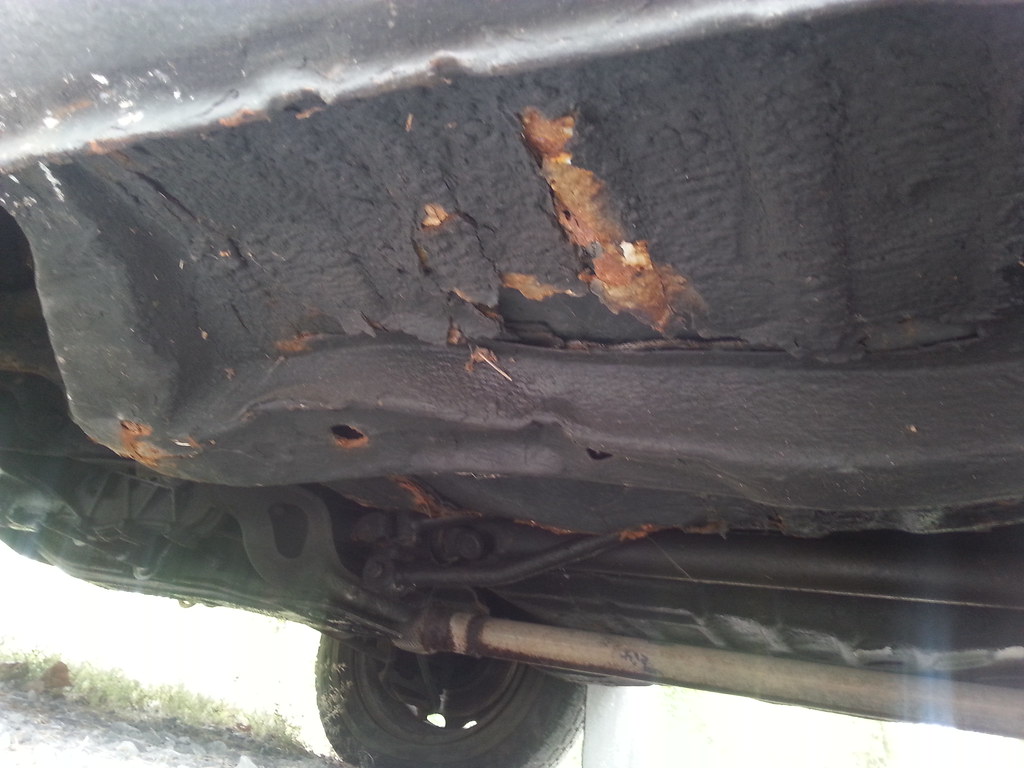
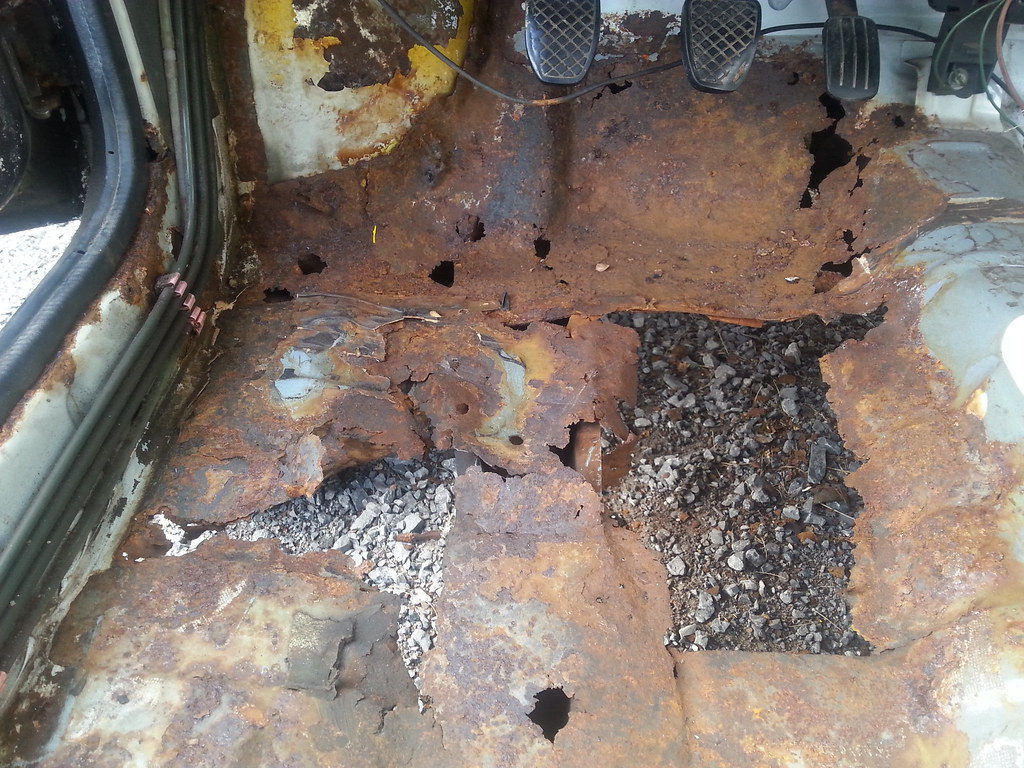
The main floor rust. The other floorpan seems to be completely rust free, happily. Should be a relatively easy job to make some new sections, and I'll hammer out the subframe while I'm at it.
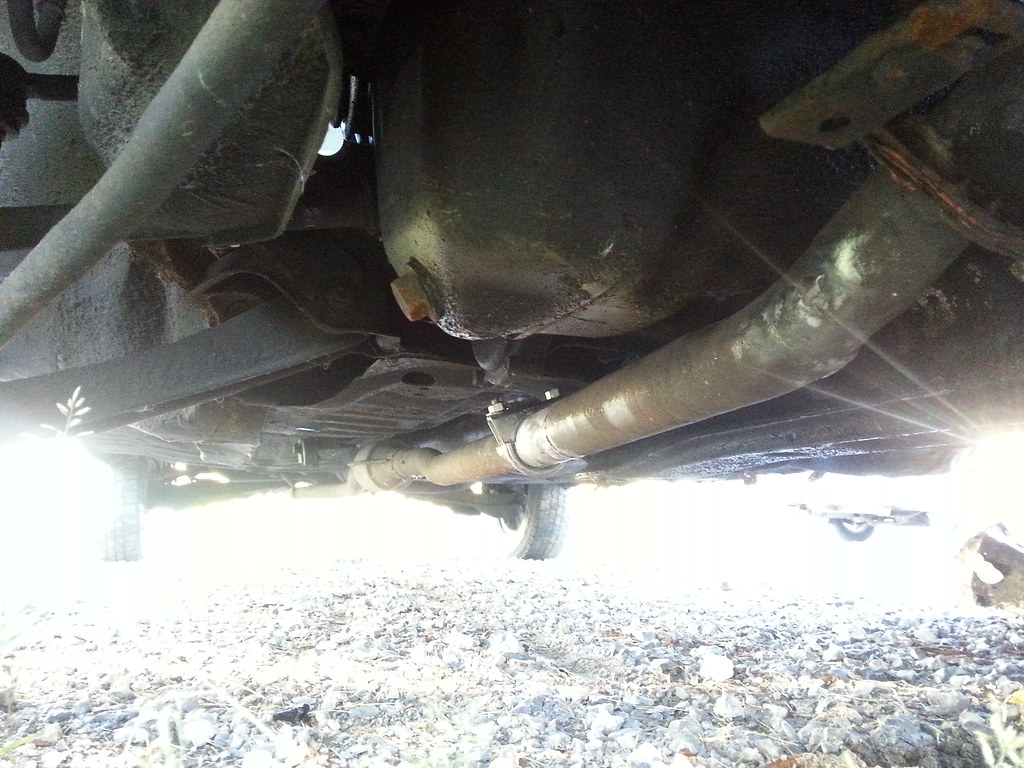
The rear bumper area will need a lot of work; Going to see if my parts-cars are in good shape here, and just cut/weld if so. Lots of little patches to do otherwise.
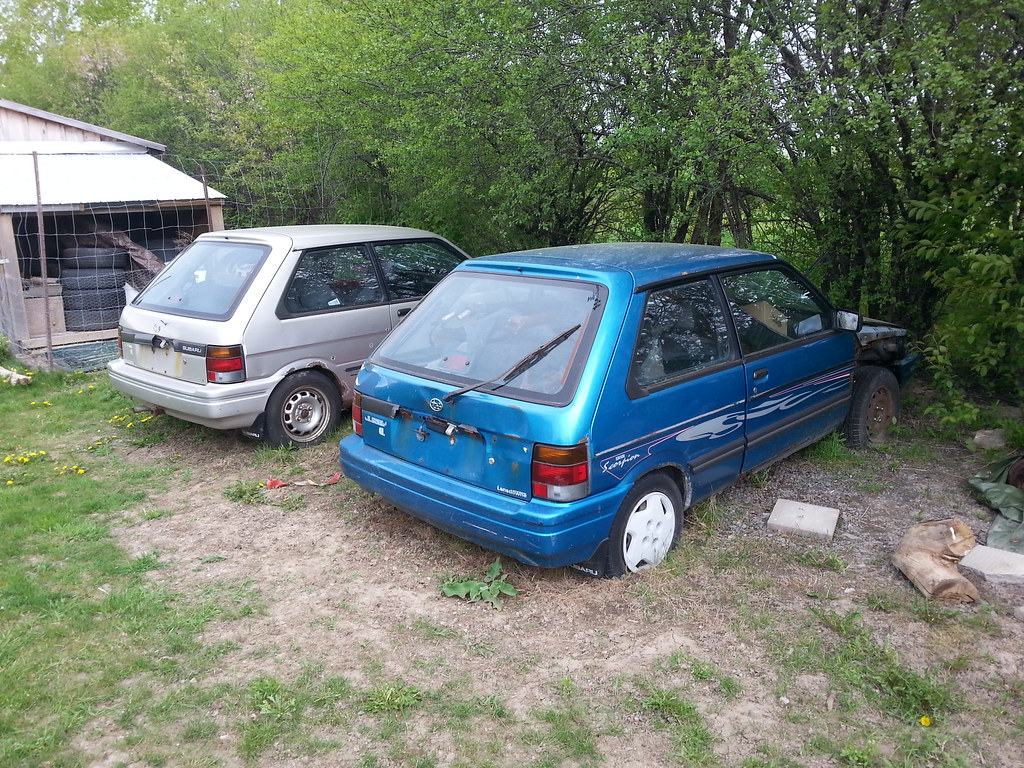
The parts-cars themselves:
Nice clean spare hatch. 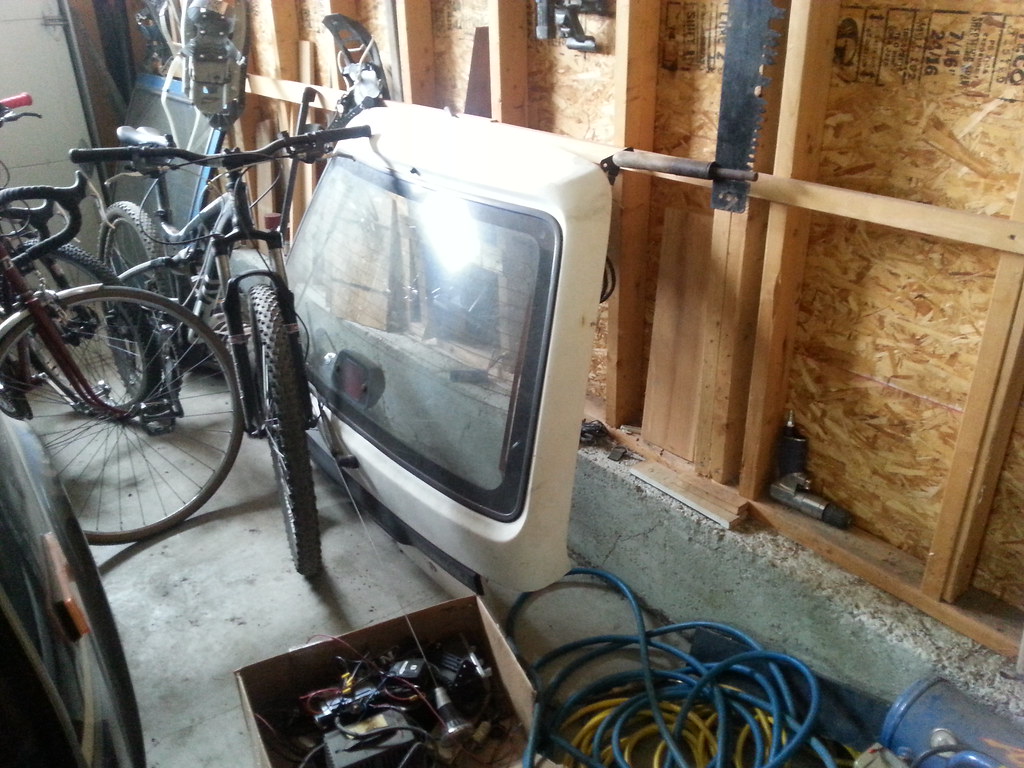 Current plan is just to get the rust sorted, maintenance done (car has sat for a couple years before I bought it), stick a skidplate and some more lights on it, and have a blast this winter. Going to start tearing it apart over the next few days. |
|
|
|
Post by noll11 on Sept 20, 2018 10:40:06 GMT -5
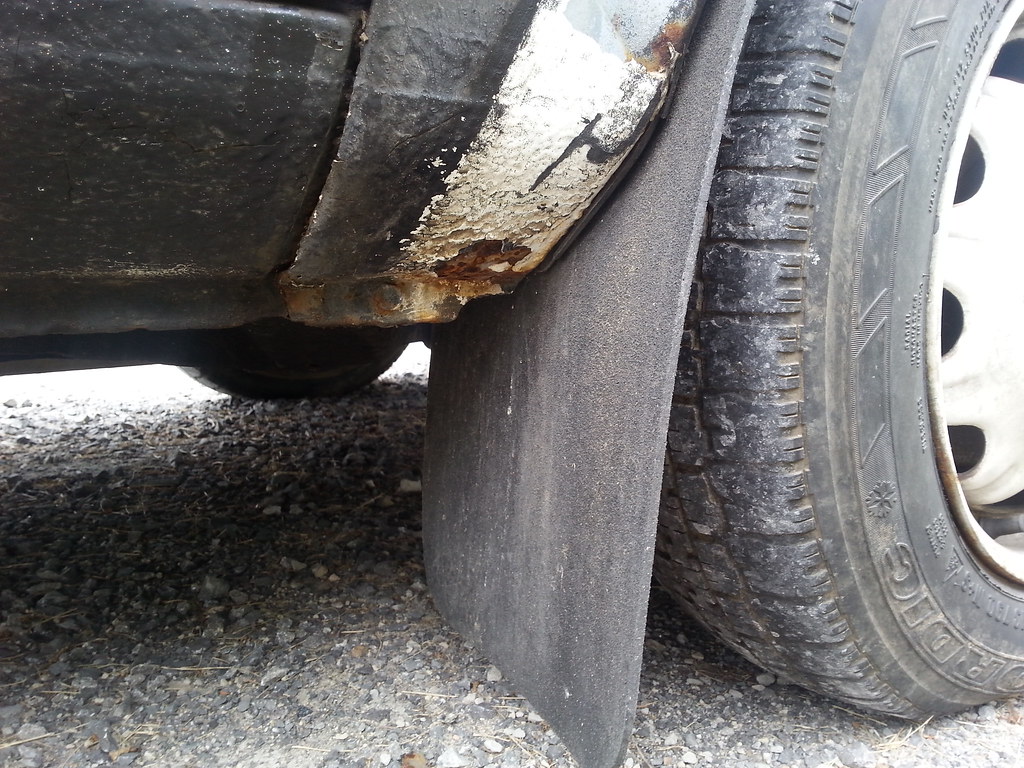
Had a little time free, so I took off the rear arch covers.
 Looks like they are indeed as bad as I thought. Mmm, crunchy. I'm thinking I have 3 main options to fix them. 1. cut back to good metal, misc patches, weld the inner/outer seams together, paint, and put the covers back on (properly). 2. Cut the arches out of my parts-cars, patch, and weld in. 3. find a car in the junkyard with a similar look and diameter on the front fenders, buy fenders, and cut up/weld in the rear. #2 could be a bit of an issue as the arches on the other 2 cars will need some work too. Also, the parts-cars are 2dr, not 4dr.
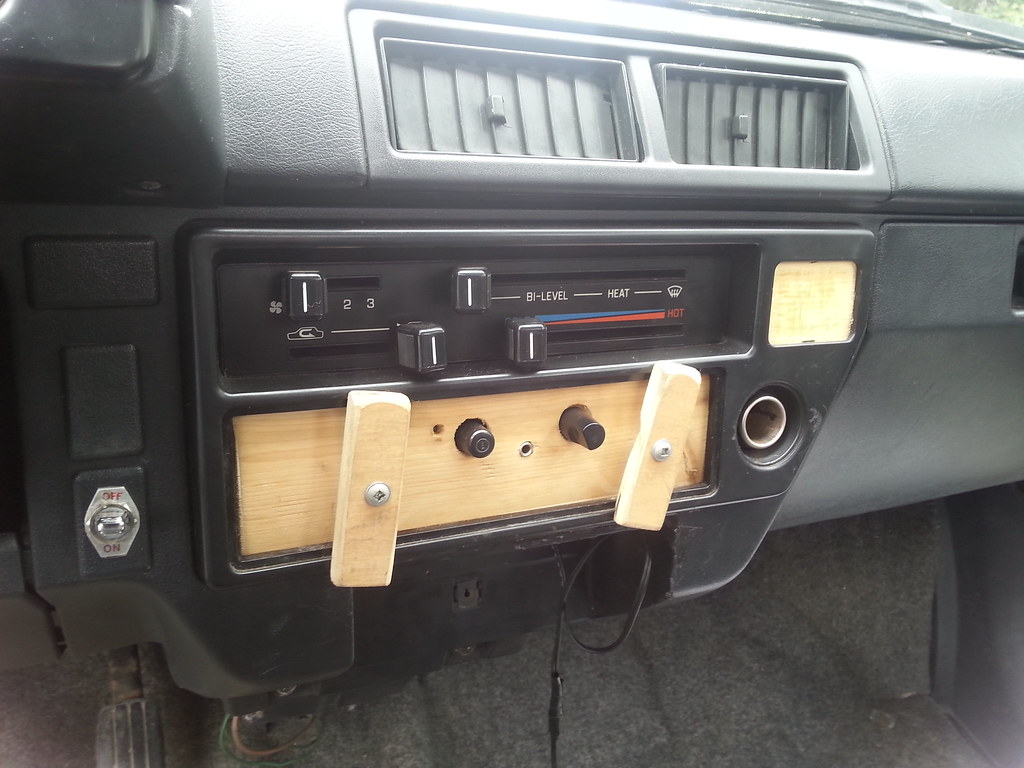
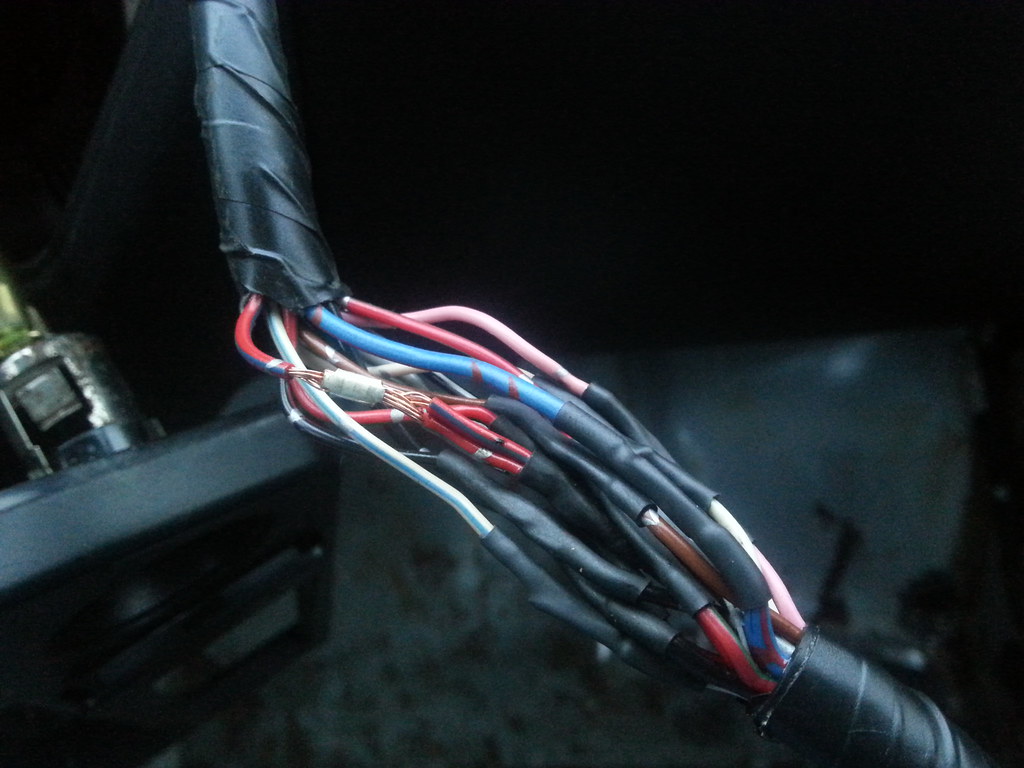
 Thoughts? Also, behold the most interesting radio delete I've ever seen. Gotta work with what you have, I suppose. I'll make a 3d-printed faceplate to replace that, clean up the wiring, and call it good, as I'd only be using a radio for aux-in anyway.
|
|
|
|
Post by noll11 on Sept 20, 2018 10:43:00 GMT -5
Got one of the front fenders off (other has a stripped bolt, will sort later), and, as I expected, the inner wings will need some work too. Not as bad as the other 2 cars though. Once It's all done and painted, I'm going to bedliner the whole thing and not put the plastic liner back in, as it's what trapped dirt and caused the rust in the first place.
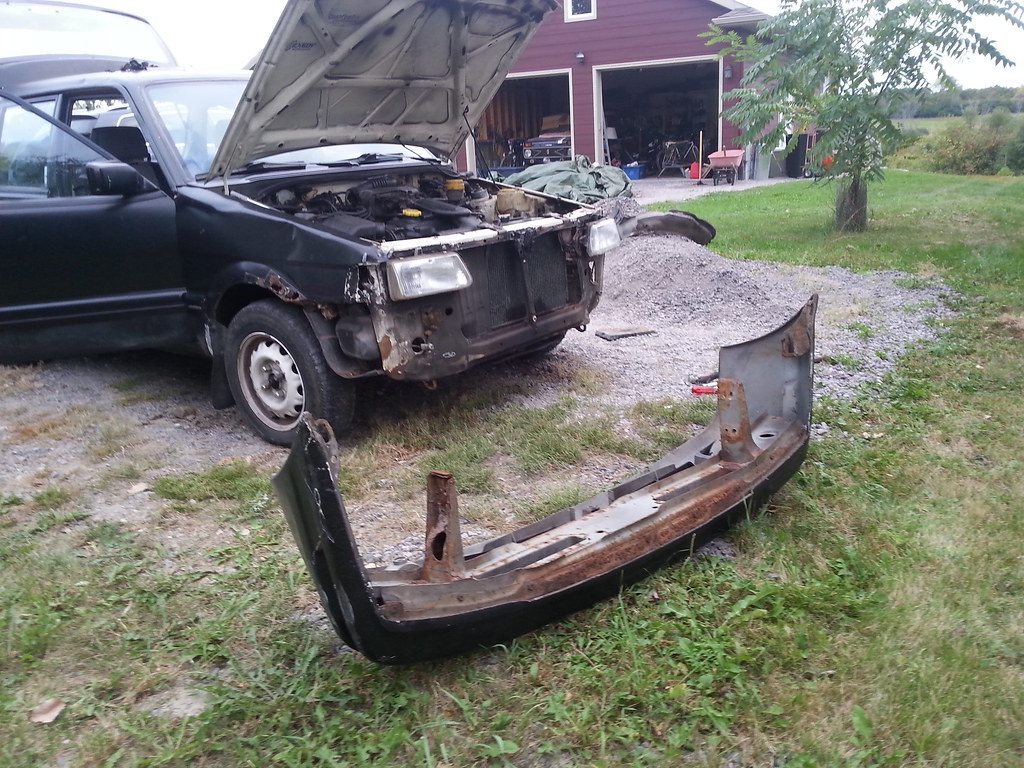
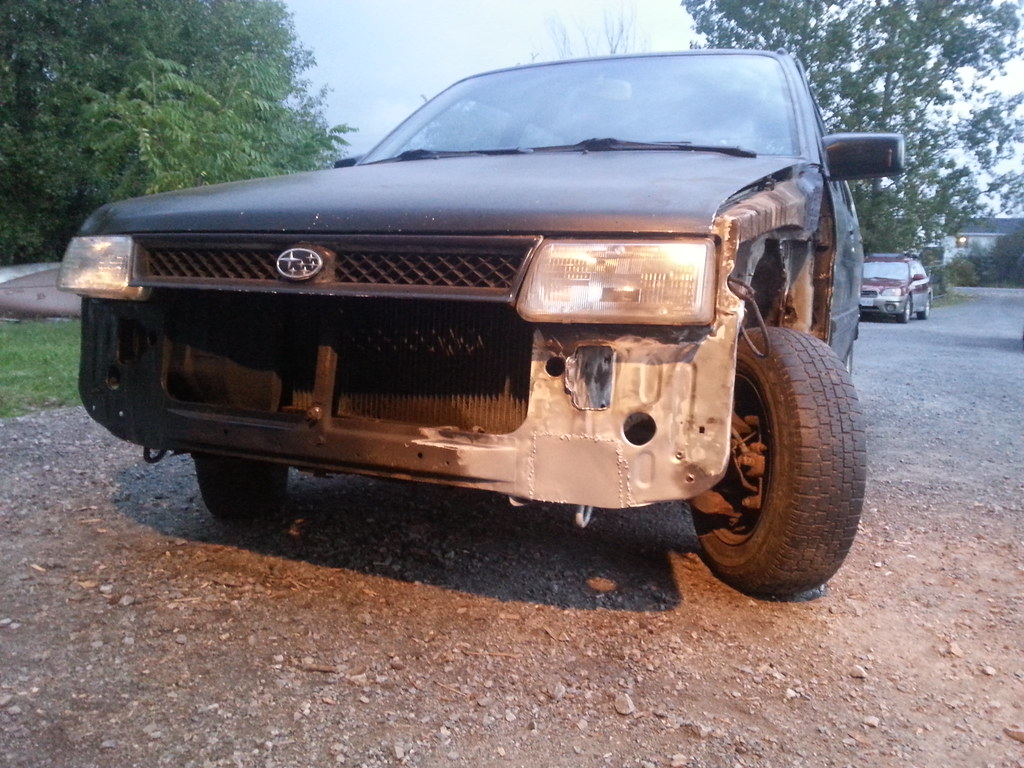
Got the front bumper off too. It's actually not in that bad shape, I just need to get the plastic cover off and wire wheel/paint the metal bar.
I'm kinda tempted to tube bumper this thing, and the front bodylines lend themselves well to that: 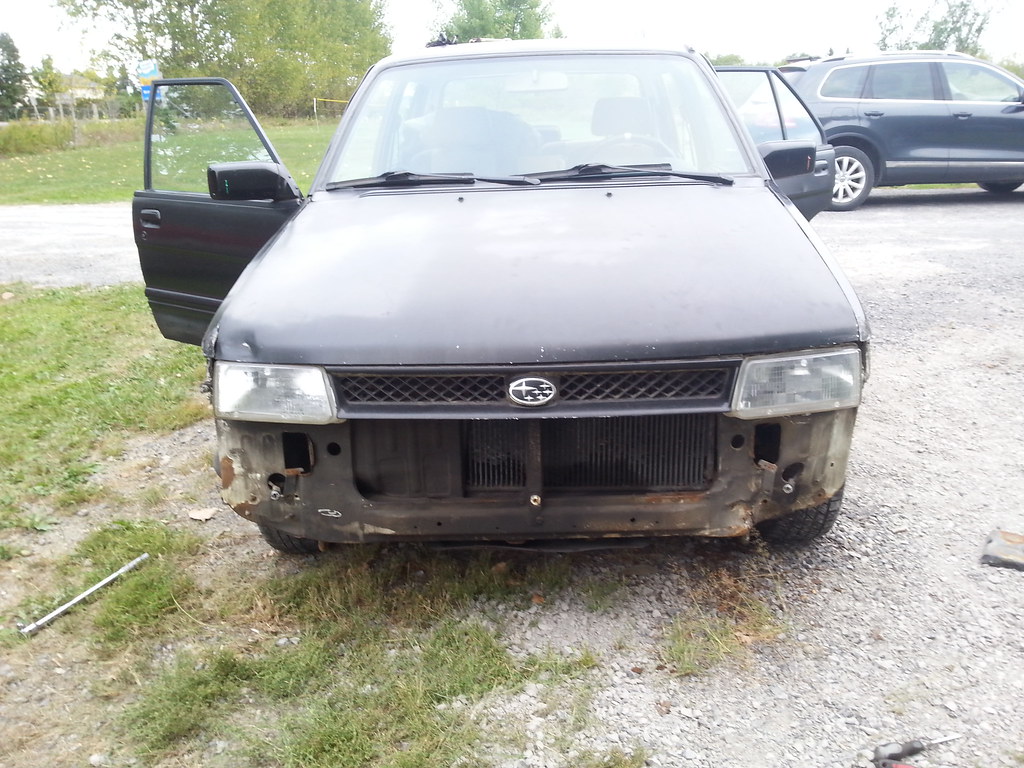 Would probably cut off this sheet metal if so: 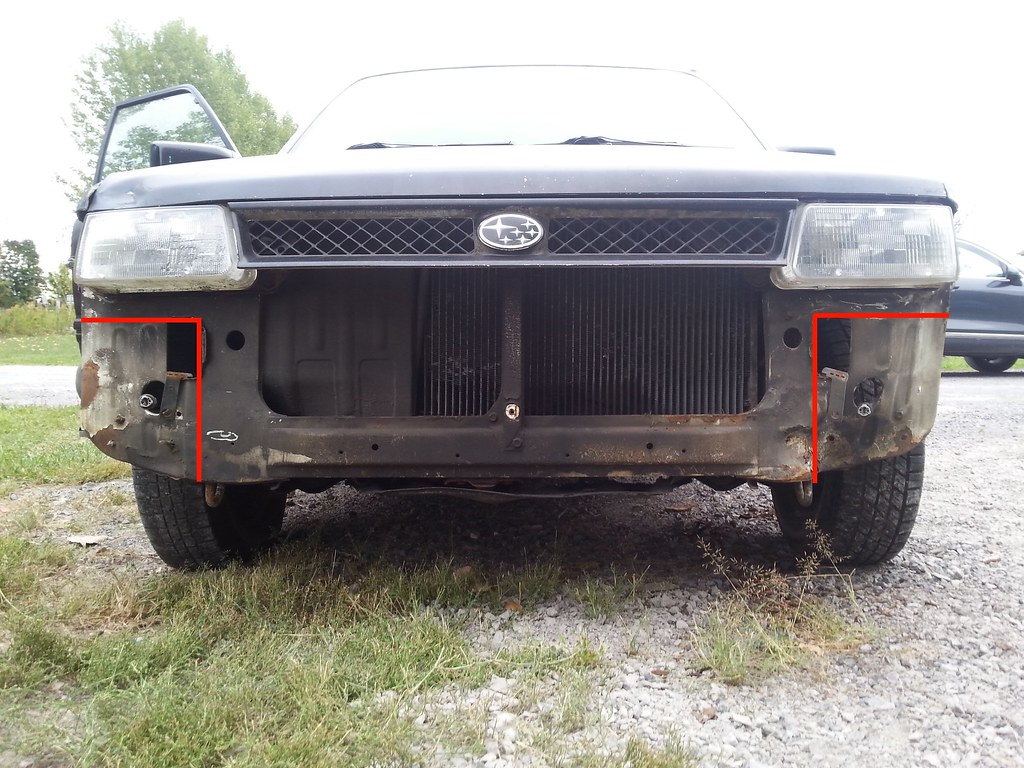 I decided to have a look at the rear bumper too. Good news, I got it off. Bad news, I took it off with my hands and no tools/bolts. Going to see if I can cut the rear lower pan/bumper mount section from one of the parts-cars. 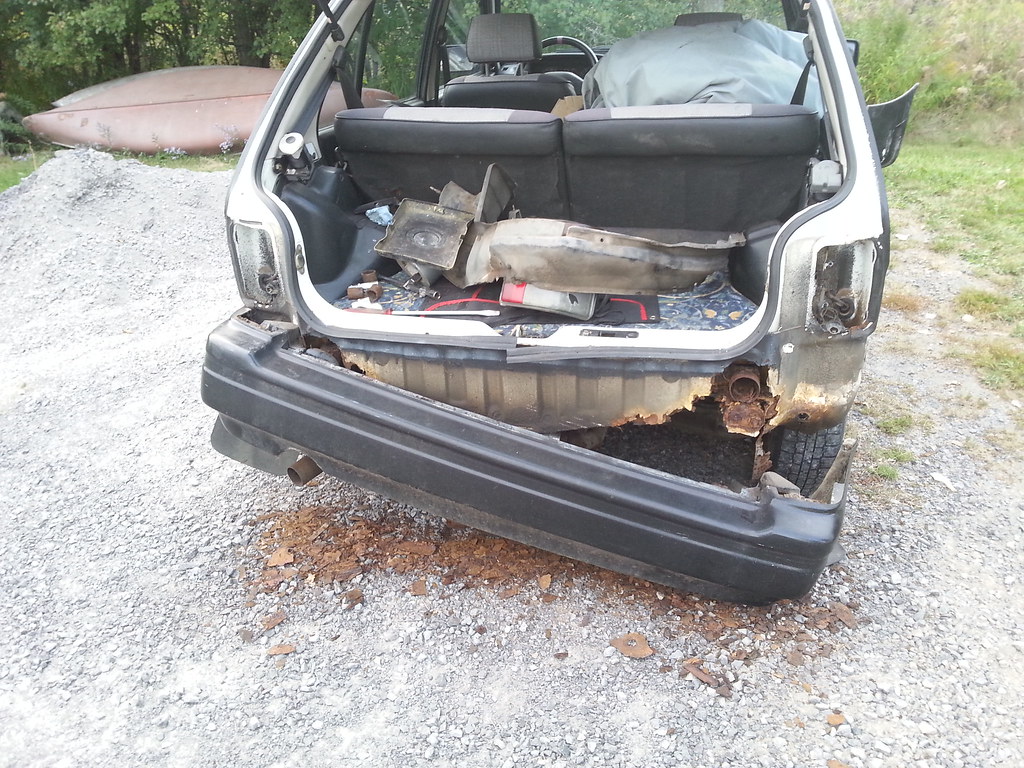
The rear lends itself well towards tube bumpers too...
 |
|
|
|
Post by noll11 on Sept 20, 2018 21:21:23 GMT -5
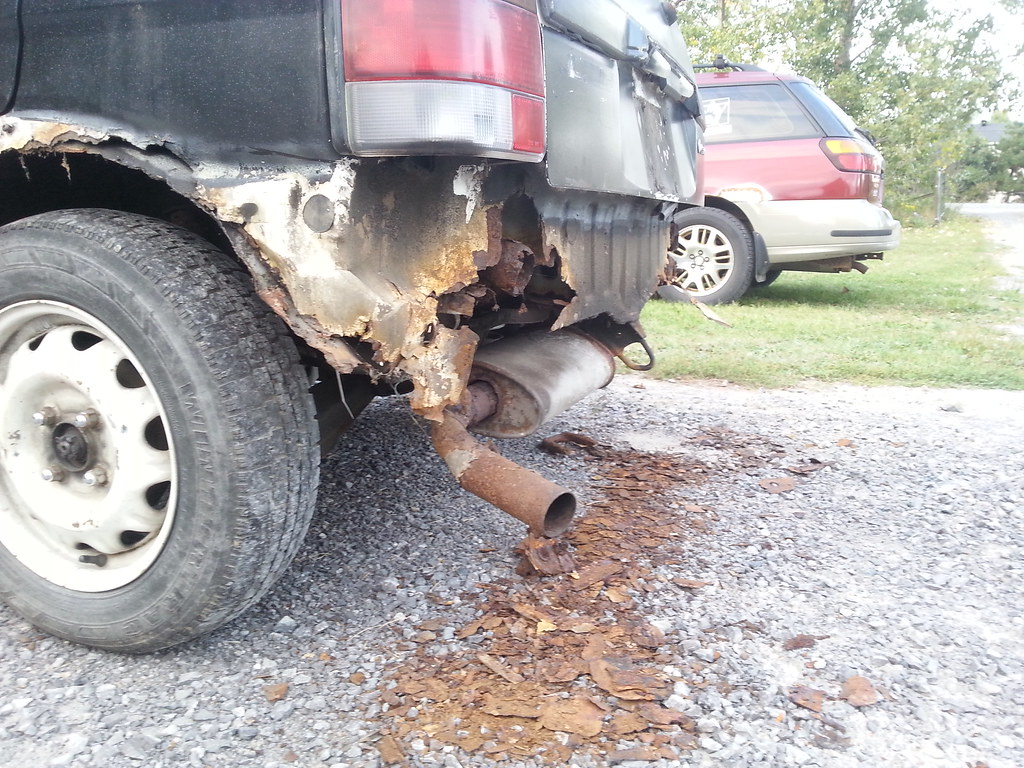
Did a lot of little stuff today. Tires swapped back to the correct cars (front left was from another car as it was flat when I picked up the Justy), figured out what's up with the rear brakes, and made sure my snow tires/wheels will fit. This is why there were no rear brakes. looks like the rear brake cylinders broke at some point, so they were just blocked off and the car was ran with front-wheel brakes only. Nice. The handbrake cables are also missing, so I'll need to grab the assembly off one of the other cars.  I also (mostly) swapped the exhaust for the one off the blue car that was in good shape. I tried to move it onto the driveway for removal, but just succeeded in removing the tow hook and sway bar mount. 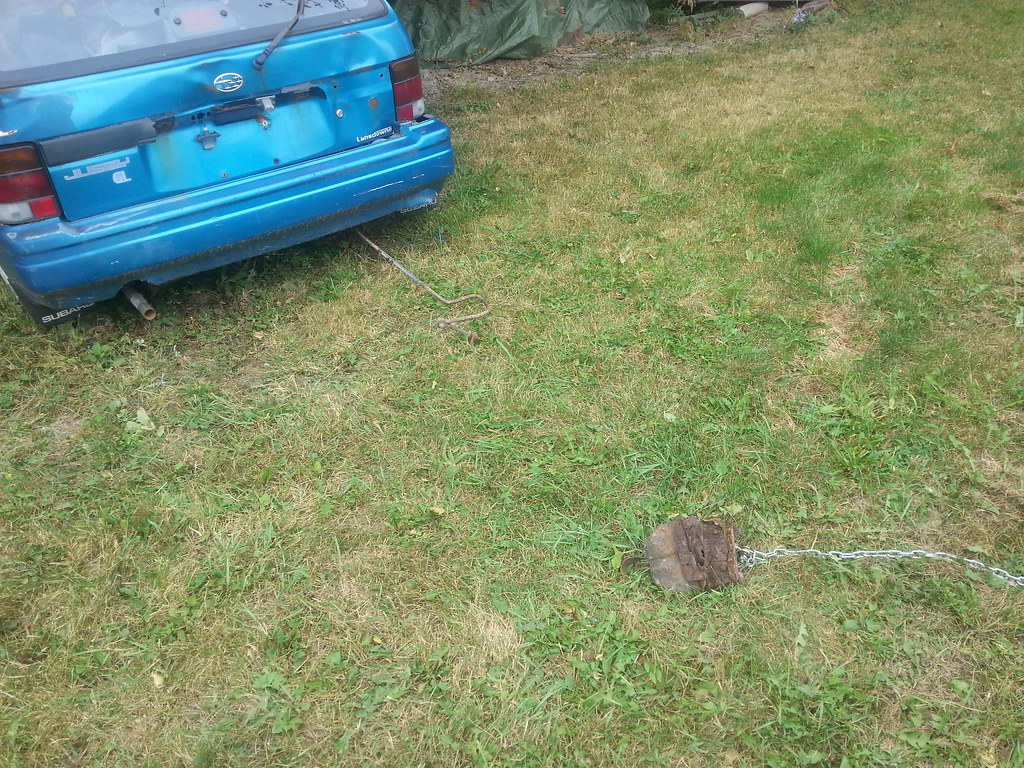 Off, and compared to the old one at the top. All one piece welded, leaking, rusty, and had no cat. Pretty sure that's some fence tubing for the middle bit too. The other one is much better. 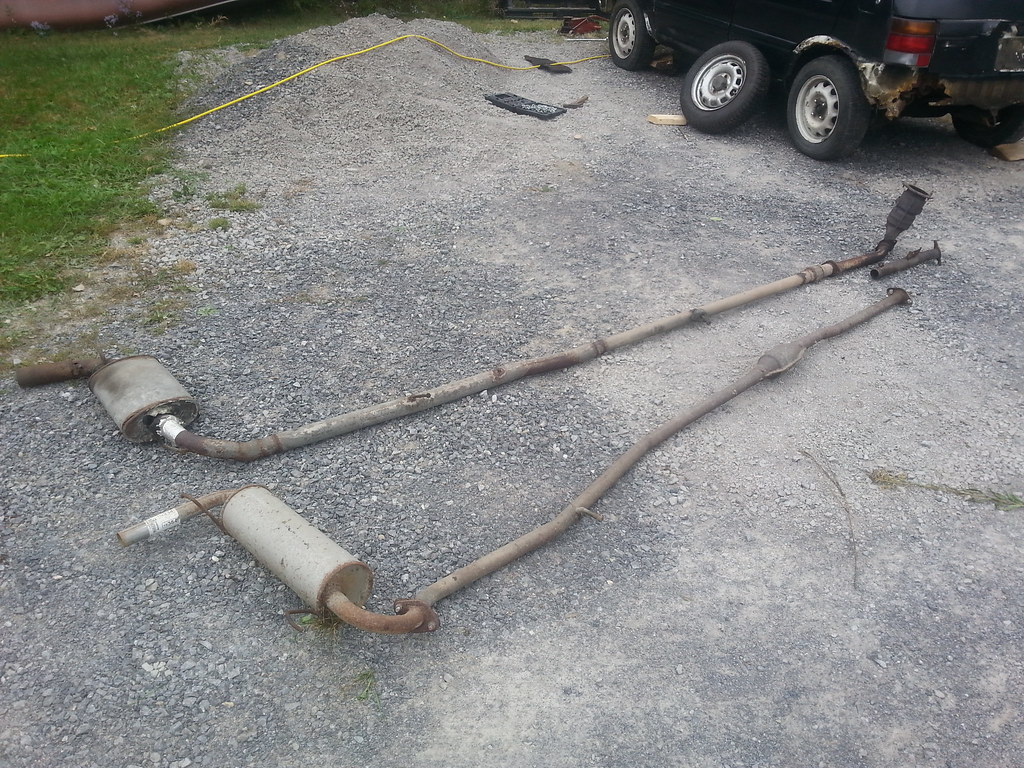 The "new" exhaust isn't without its flaws though, the main one being that a flange at the front has rusted out. I'm going to being the whole exhaust to a shop and have them weld a new one on, I can't imagine it'd cost much. 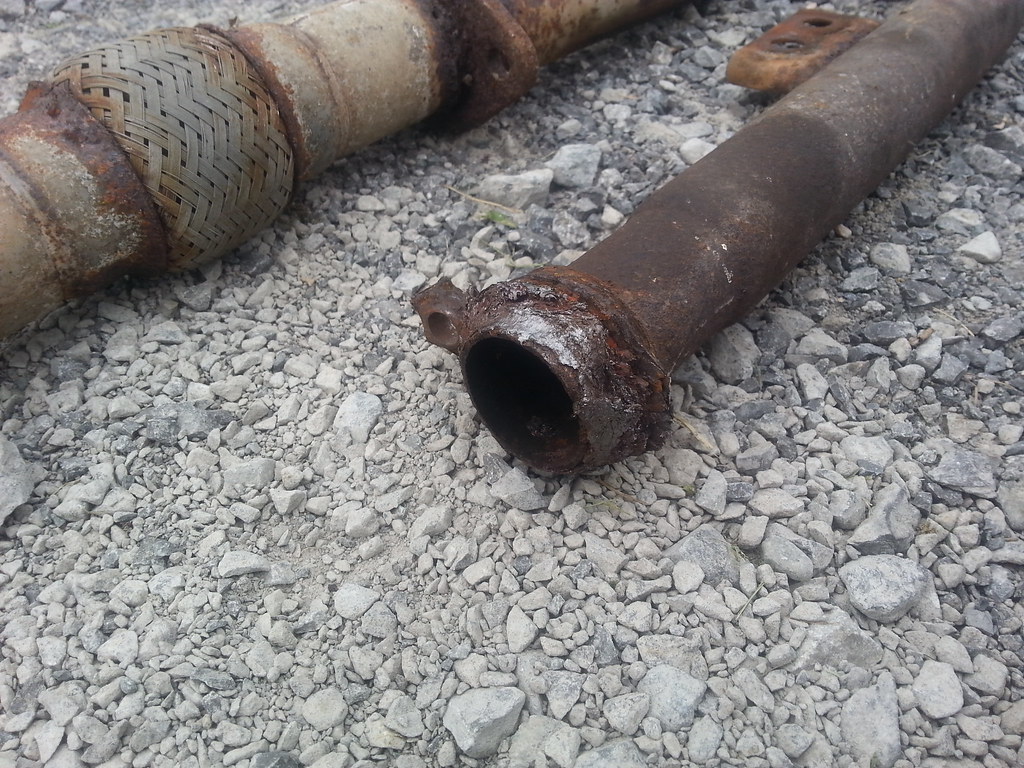 and mocked up in the car. Somehow, throughout this whole process, I only snapped one bolt, and it's one of 5 holding the exhaust to the manifold, so I'm not really concerned by it. 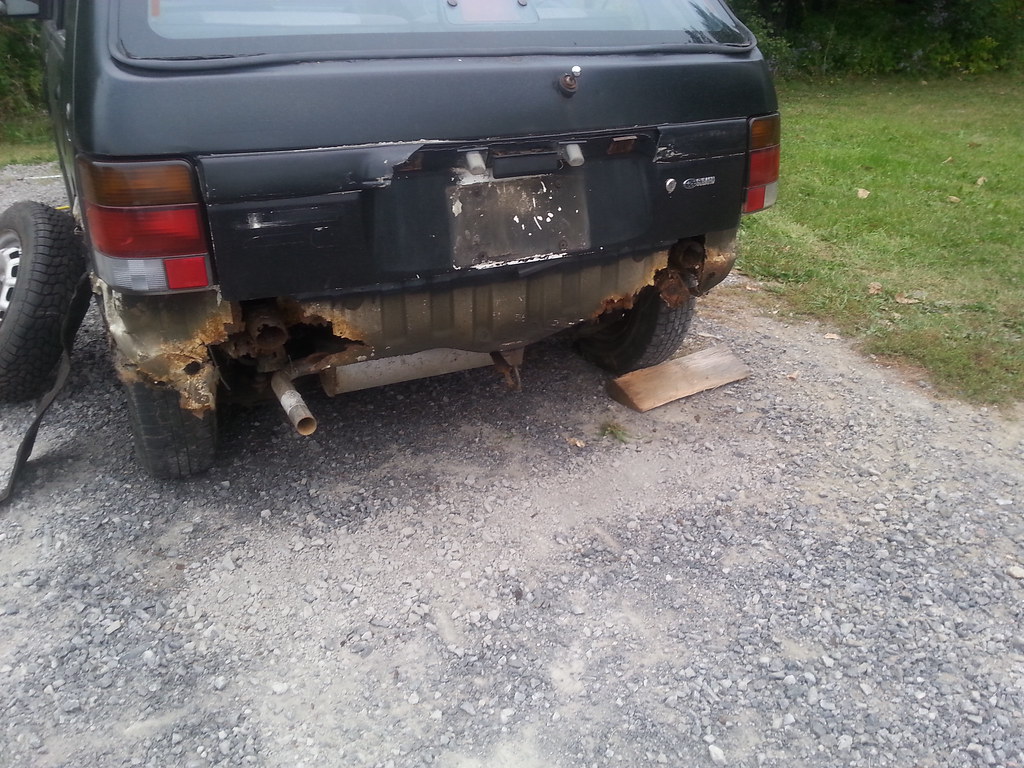 |
|
|
|
Post by noll11 on Sept 23, 2018 20:23:40 GMT -5
Stripped out the carpet, seats, and sound deadening today. Carpet was in pretty bad shape, so it went right into the trash. Unsure if I'll bedliner the floor or put the carpet in from a parts-car.
Driver's side is pretty full of holes, but should mostly be pretty straightforward patches, the ones that butt onto the firewall may be a bit of a pain though. Going to need to snag seat mounts off one of the other cars too. 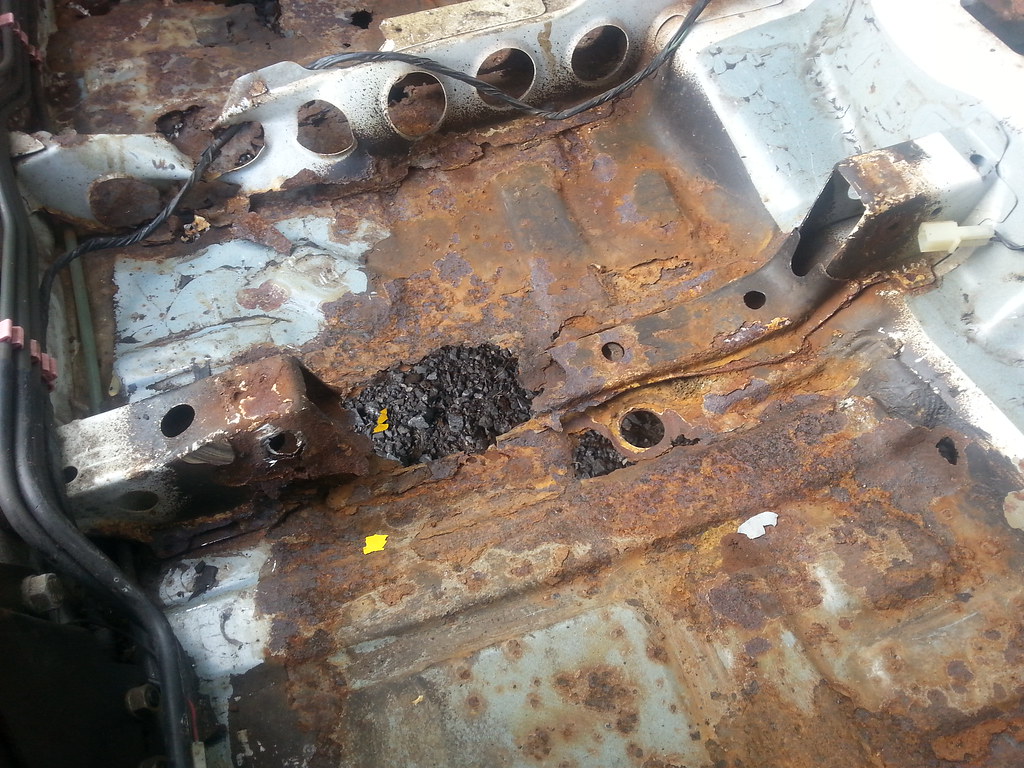
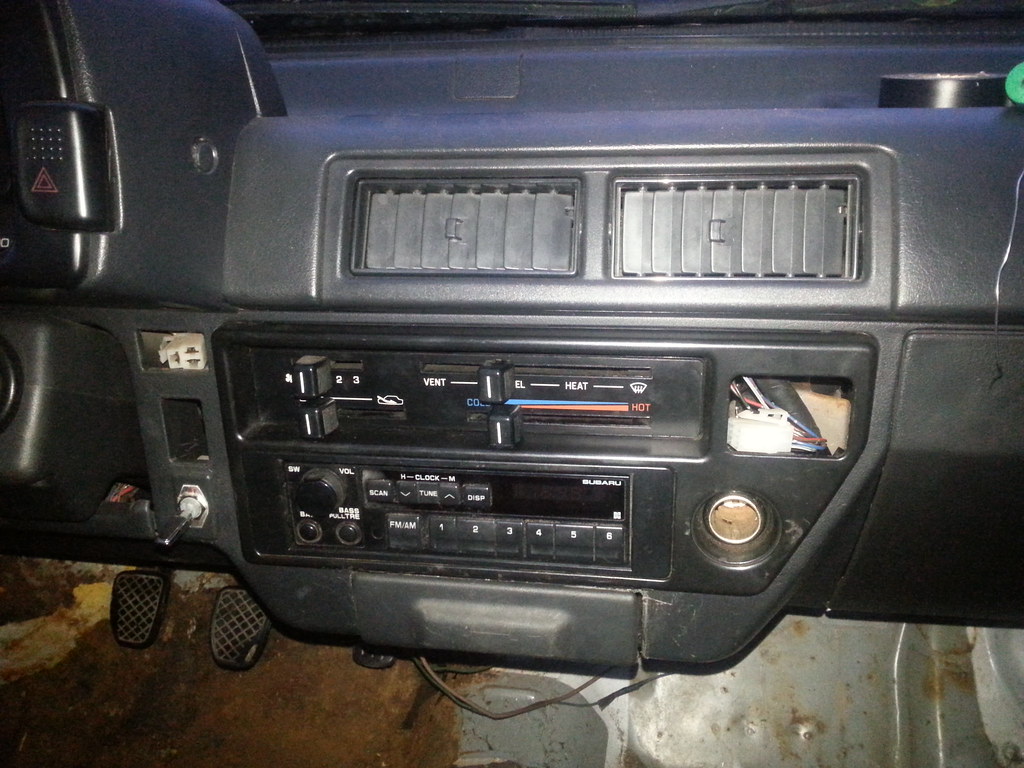
Passenger side will need a couple tiny patches, but it's in great shape overall:  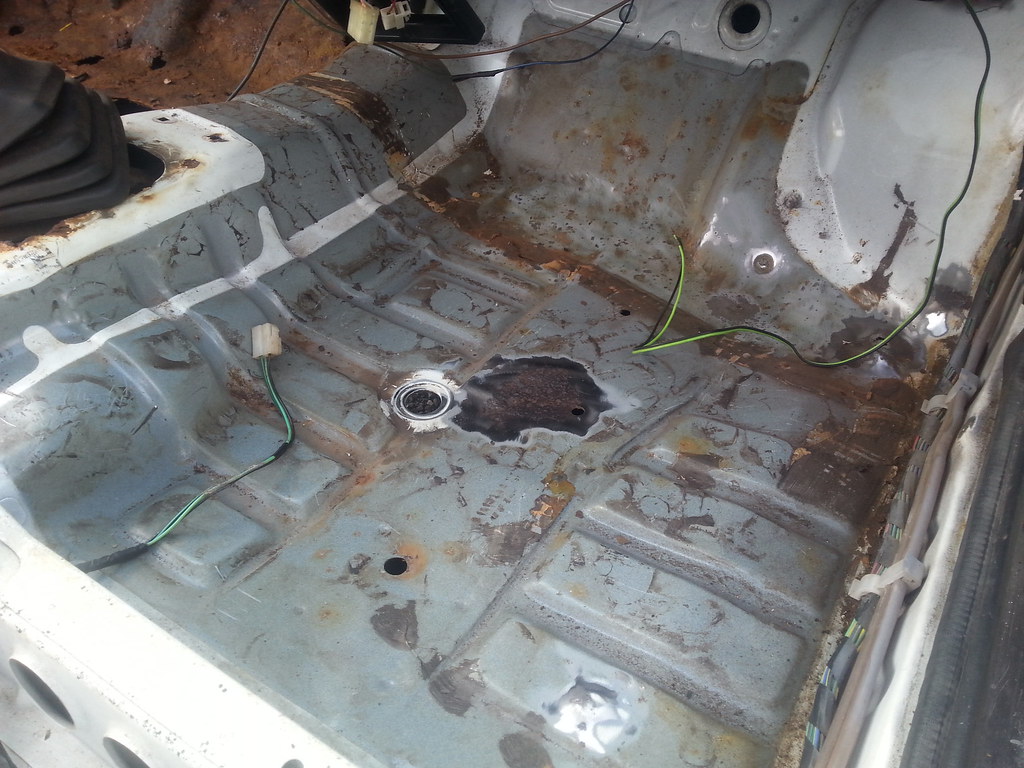 Also grabbed the radio out of my blue justy, and installed it in this car. What I started with after removing the wood plate and aux-in device-thingy:
Cut out the end of the radio harness as it had been hacked apart by the PO's install of the aux input device. 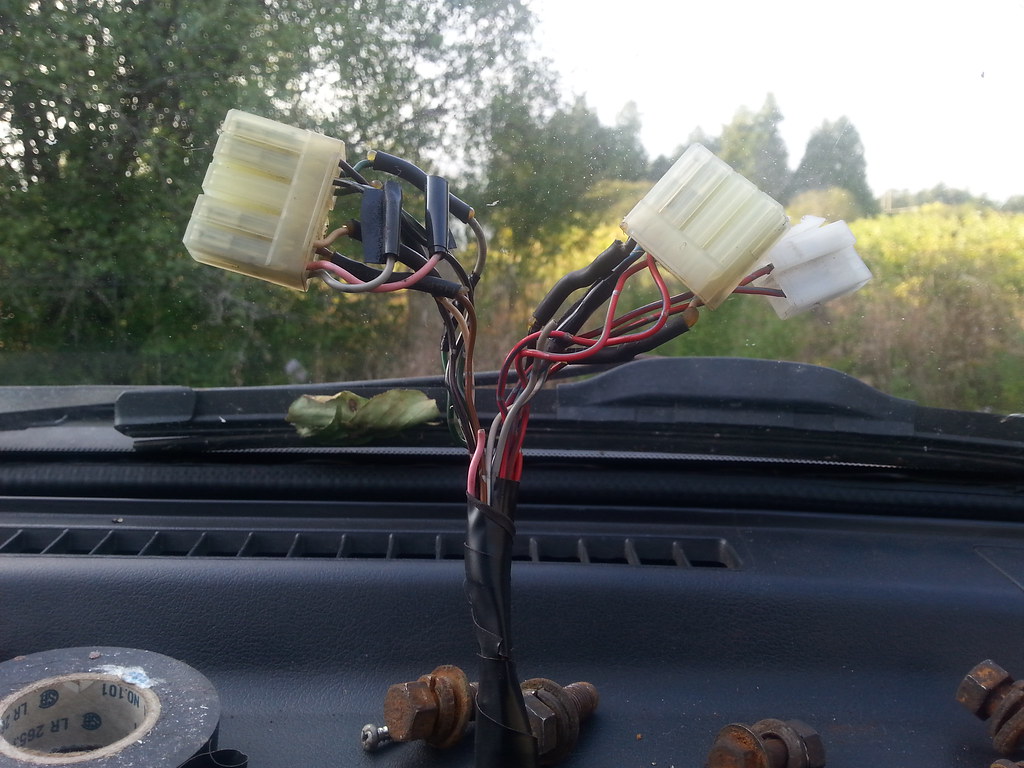 Cut the same part out of the blue car and spliced it in. All soldered nicely and heatshrinked. No pic of after, but I wrapped it with electrical tape like stock. Bare wire visible is from the factory, assuming it's to split the ground wire into 2.
And all installed. I need to make a block-off plate for the top right hole, and reinstall the ones for the other 2 holes. Also installed the coin storage area from another car as it was missing.
 |
|
|
|
Post by noll11 on Sept 24, 2018 14:52:20 GMT -5
No real work on the car today, but I went and got the ownership officially in my name. It was a Quebec car and I'm in Ontario, so I wasn't sure how registering it in Ont would go, but happy to report I managed to bring the right papers the first time.
Next up will be to strip the brake/fuel lines out of the driver's side so i can start work on the floor, and to remove the rear drums to check on the condition of everything in there.
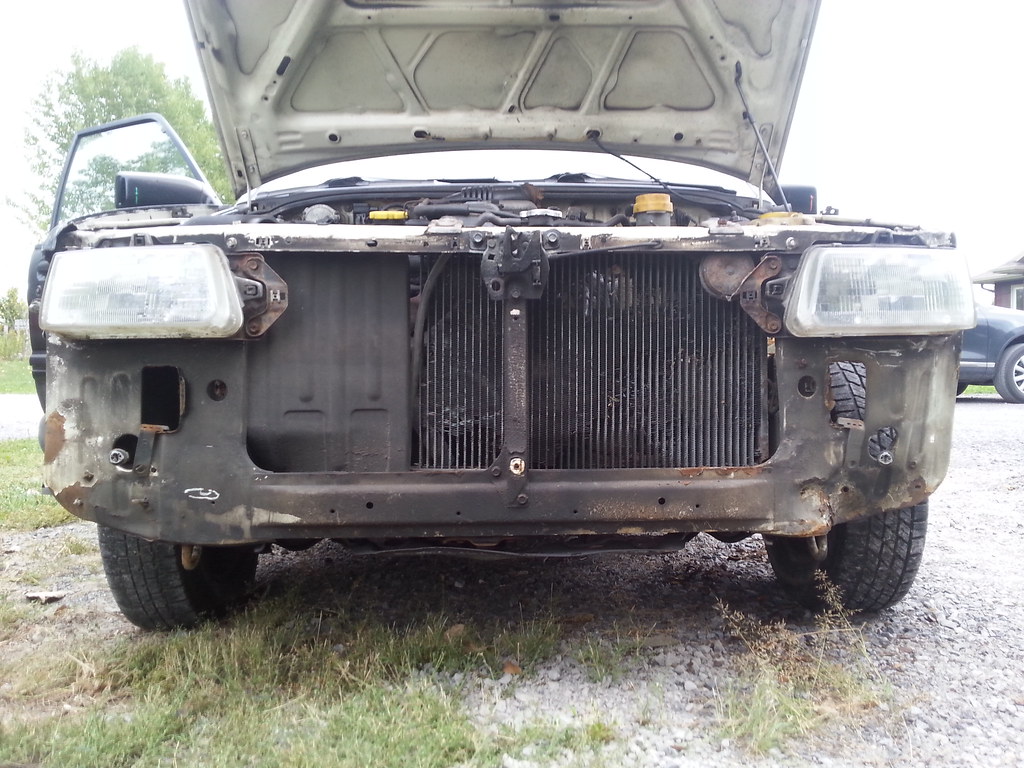
I'm also going to go to a junkyard tomorrow to see about getting a new radiator (got dimensions written down), and possibly some fenders from other cars I can cut up to repair my rear arches.
|
|
|
|
Post by gearheadeh on Sept 25, 2018 10:08:09 GMT -5
No real work on the car today, but I went and got the ownership officially in my name. It was a Quebec car and I'm in Ontario, so I wasn't sure how registering it in Ont would go, but happy to report I managed to bring the right papers the first time. Next up will be to strip the brake/fuel lines out of the driver's side so i can start work on the floor, and to remove the rear drums to check on the condition of everything in there. I'm also going to go to a junkyard tomorrow to see about getting a new radiator (got dimensions written down), and possibly some fenders from other cars I can cut up to repair my rear arches. Welcome by the way.. as for a rad, you can find Suzuki car rad almost fit, a bit tall, need to move lower mount down and hammer hood crossbrace flat, or old Honda rads are even closer. Hard to find a brass rad that is not all corroded, I went with an Aluminium rad from a Suzuki/ Pontiac Firefly. |
|
|
|
Post by noll11 on Sept 25, 2018 13:08:53 GMT -5
Thanks! Just did some rainy junkyard hunting as it so happens, found a rad from a Tercel that I believe will work nicely. Its about 10cm wider than the stock one, but roughly same height and thickness, and the inlet/outlet are in the correct places. The extra width should be ok if Ive measured the car correctly. Will get a pic when I get home.
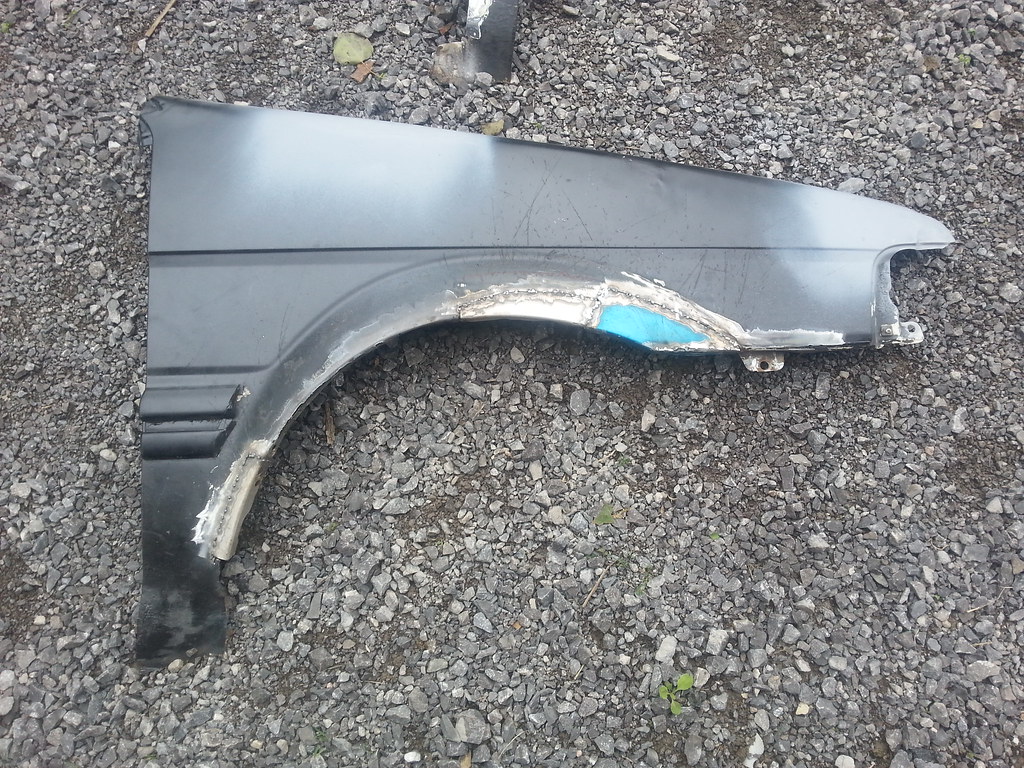
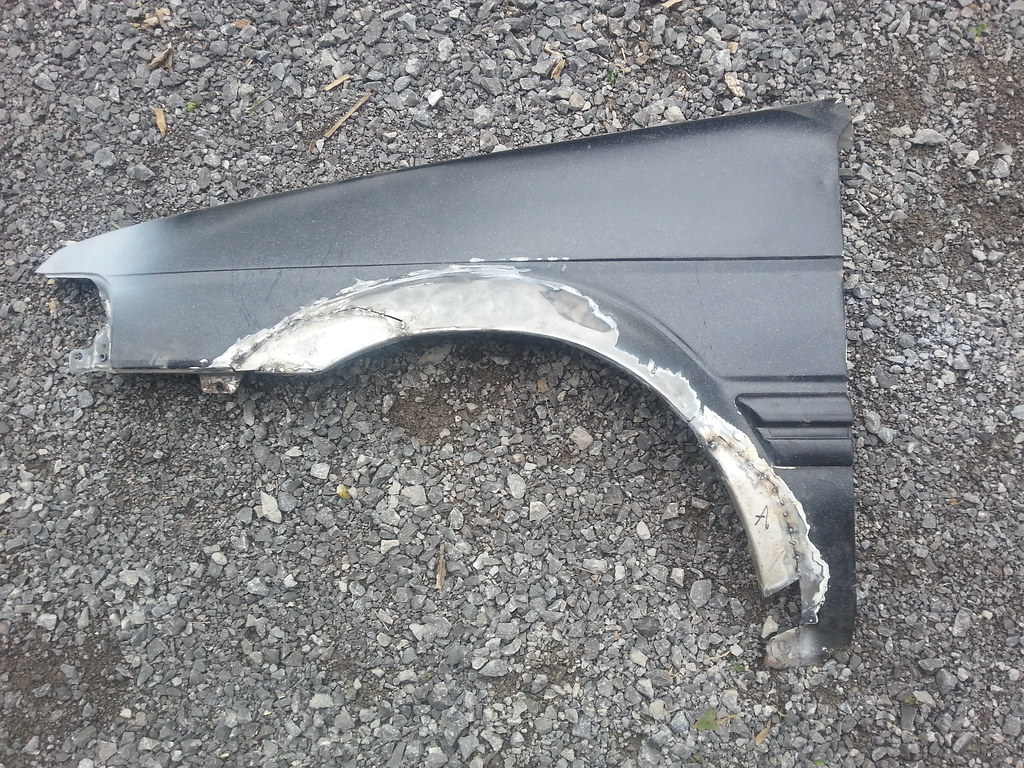
Also grabbed some fenders off a suzuki swift, as the curvature/size is pretty close to the rear arches of the justy. Going to cut and weld on the relevant sections.
|
|
|
|
Post by noll11 on Sept 25, 2018 14:40:47 GMT -5
And pics:
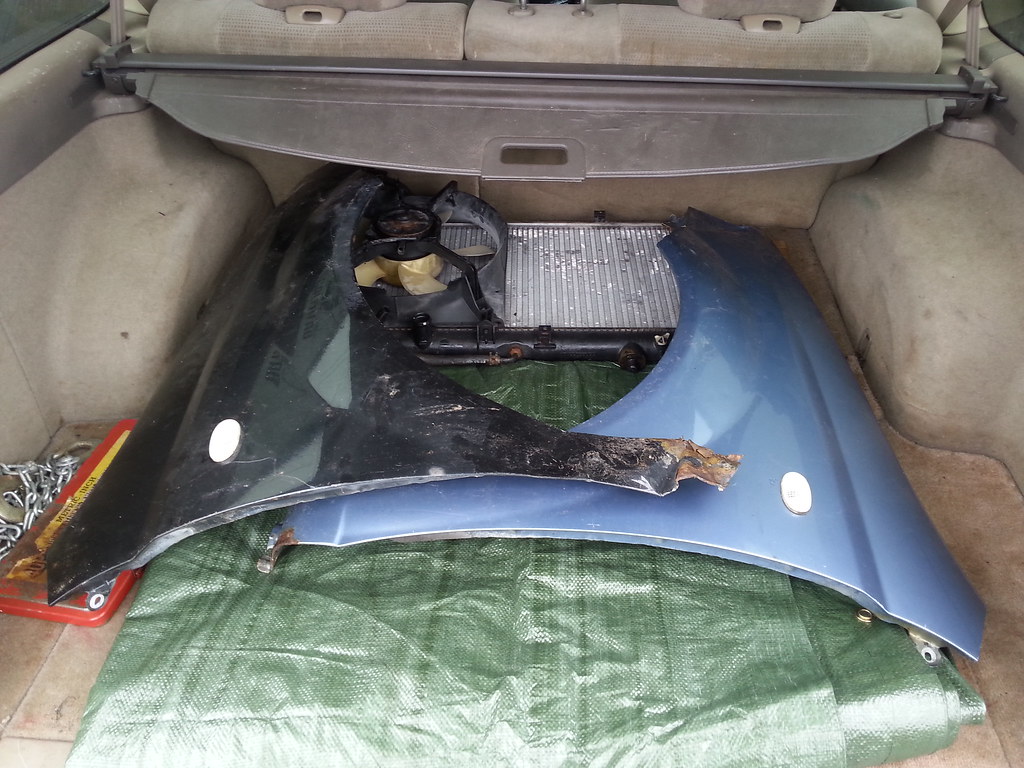 Inlet/outlet are on the correct side: 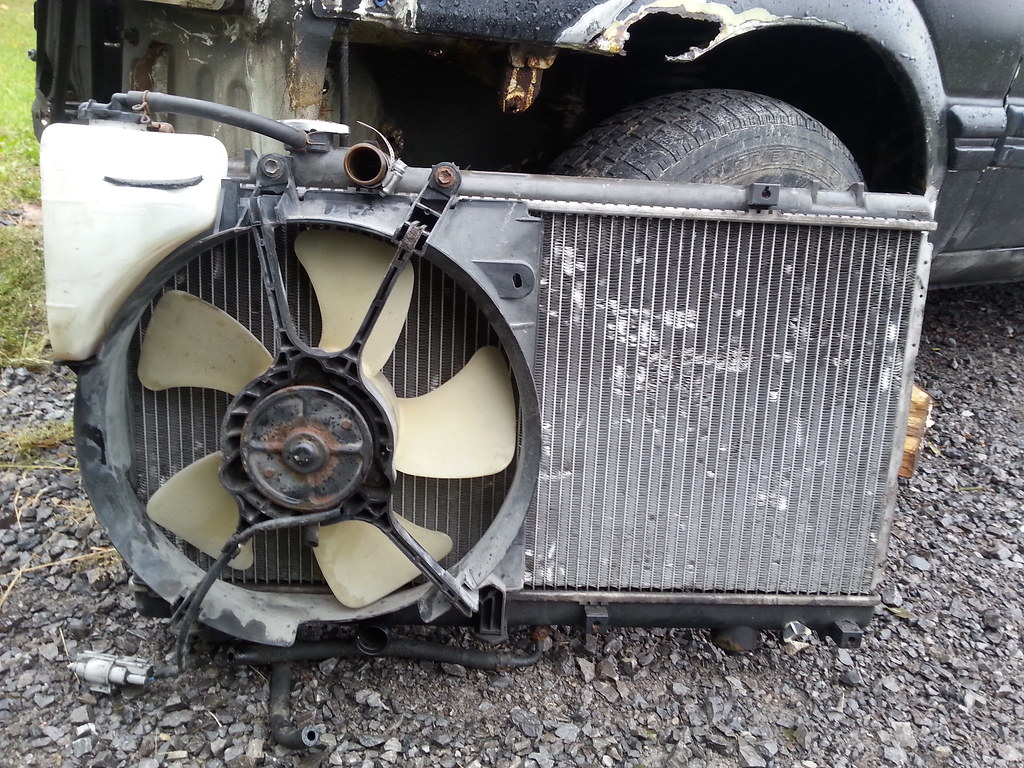 Width difference: 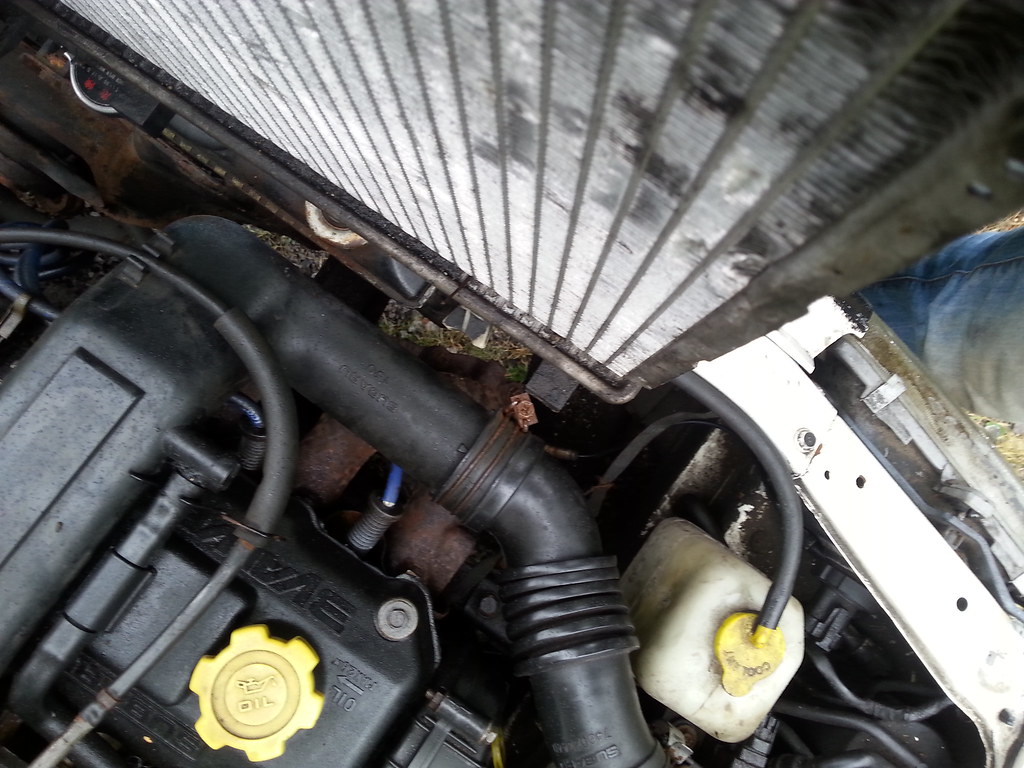 Swift fender arch vs justy fender. Will need some work to match exactly, but pretty close! 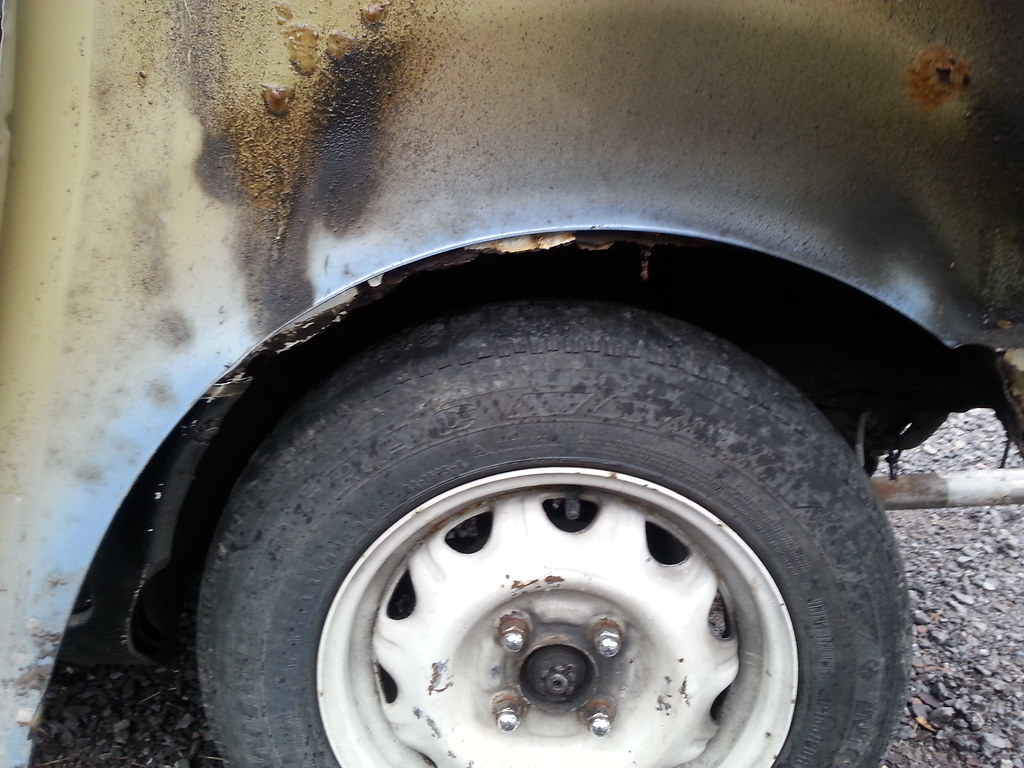 |
|
|
|
Post by noll11 on Sept 26, 2018 21:38:33 GMT -5
Today was mostly spent collecting more stuff that I'll need for the justy (finally got a torque wrench, and picked up some more cutting discs, paint, etc), but I was able to get the exhaust more-or-less permanently sorted. I bought a section of connecting pipe (1.5"ID to match the exhaust) and a couple clamps to replace the rusted out flange at the main exhaust join. I was just going to bolt it all together, but while welding up a couple pinholes I saw in the rusted section of pipe, I decided to just weld one end of the connecting piece on to simplify things and help reduce leakage.
Turned out pretty OK I think:
And all installed. I'm going to have to remove the exhaust again for the rear bumper area repair, so I didn't bother removing the old gasket-maker stuff from the flange yet.
|
|
|
|
Post by noll11 on Sept 27, 2018 20:40:09 GMT -5
More progress today. Stripped the p/s front apron for paint, to get rid of surface rust. Pic is just after rust-converter application, I wiped everything down with brake cleaner before primer/paint. 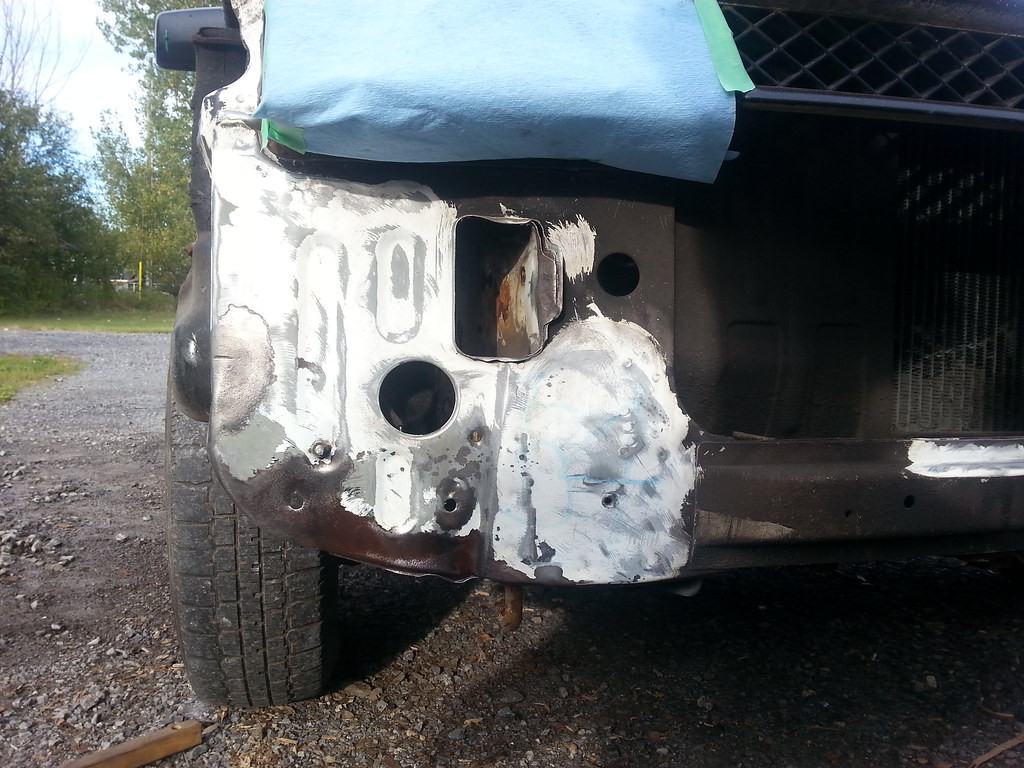 All done. Need to swap out that headlight for one with a intact seal at some point. Paint isn't perfect (mostly due to not feathering the edges of the old paint), but It'll work just fine, and that seems to be the theme of this build - "good enough". 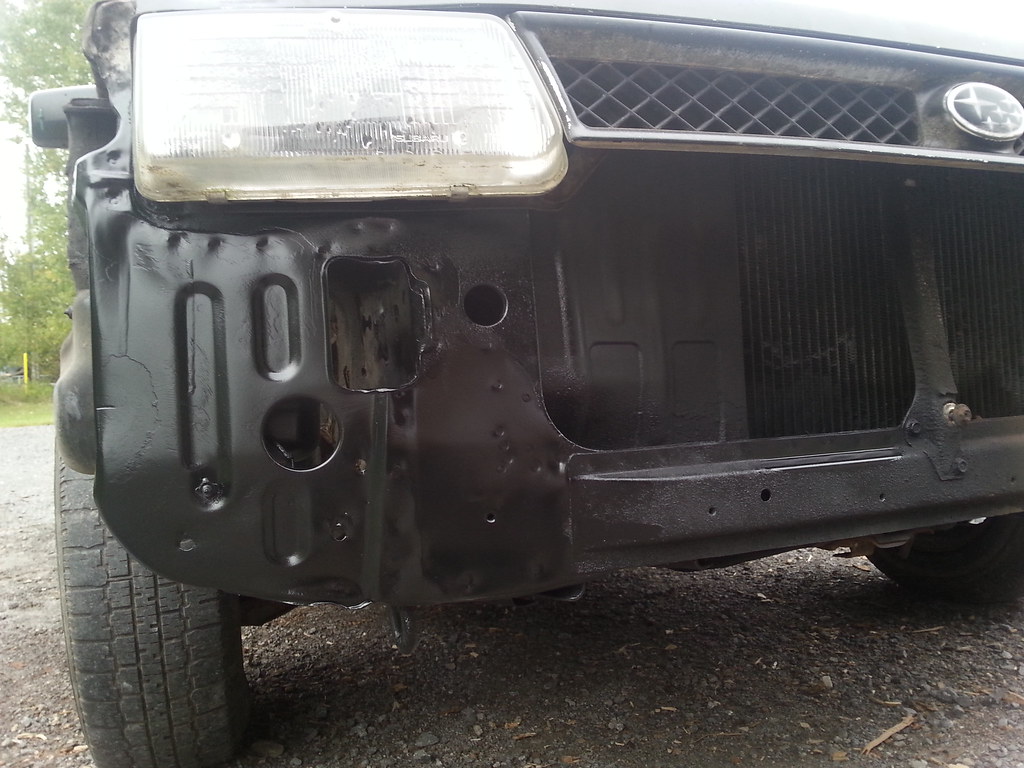 Next up was to deal with this bubbling rust at the rear door: 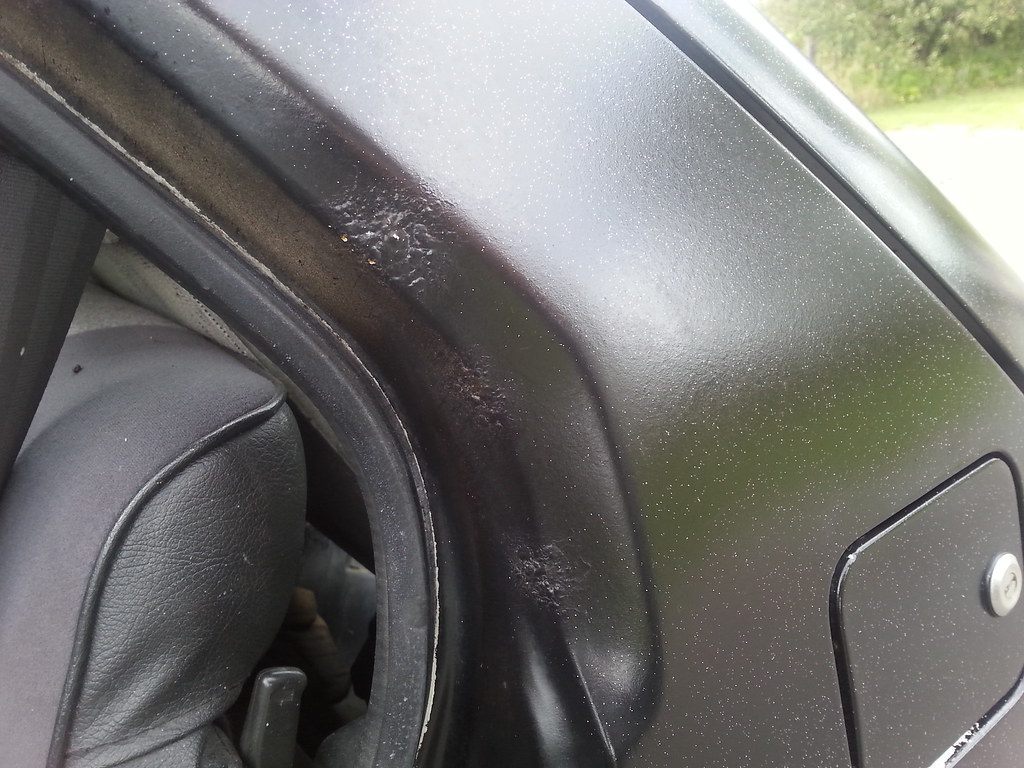 Stripped, primed, and painted. You can see where the rust pockmarked the metal, but again, good enough, the bodywork is a mess anyway. This'll be a fun beater that I'll keep in good mechanical shape but not have to care about door dings, dents, etc. The black I used actually blends pretty well with the door, all things considered. 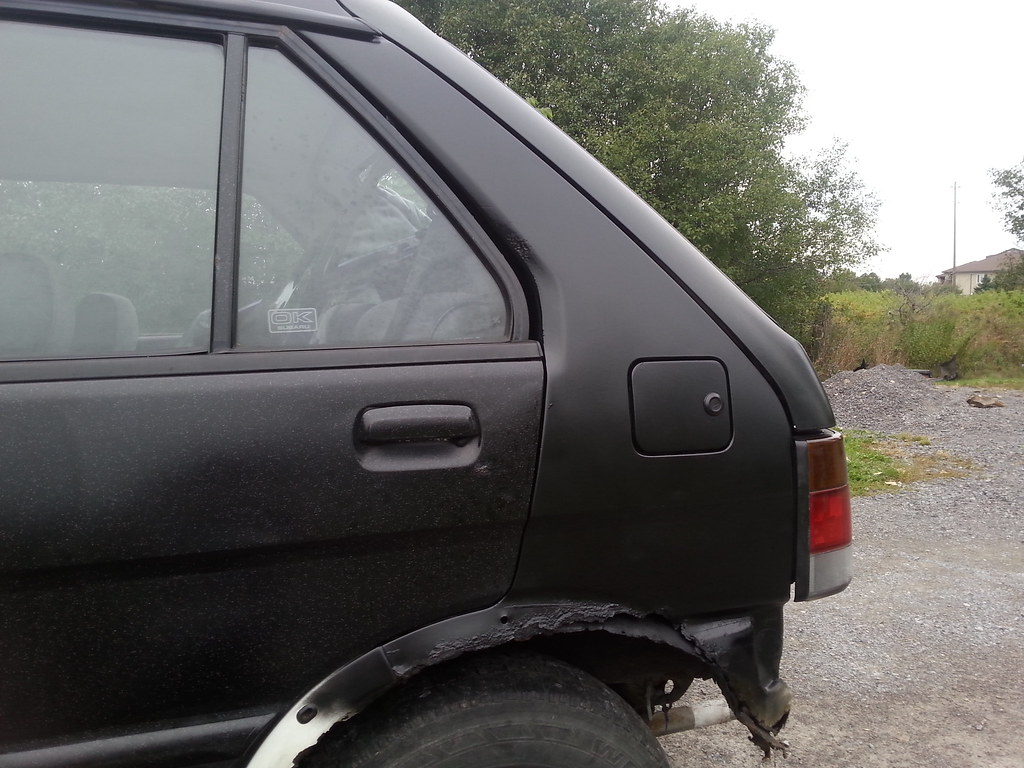 Similar repair to some rust bubbles in the front drip rail. Super ghetto setup for eliminating overspray on the windows, but it worked. 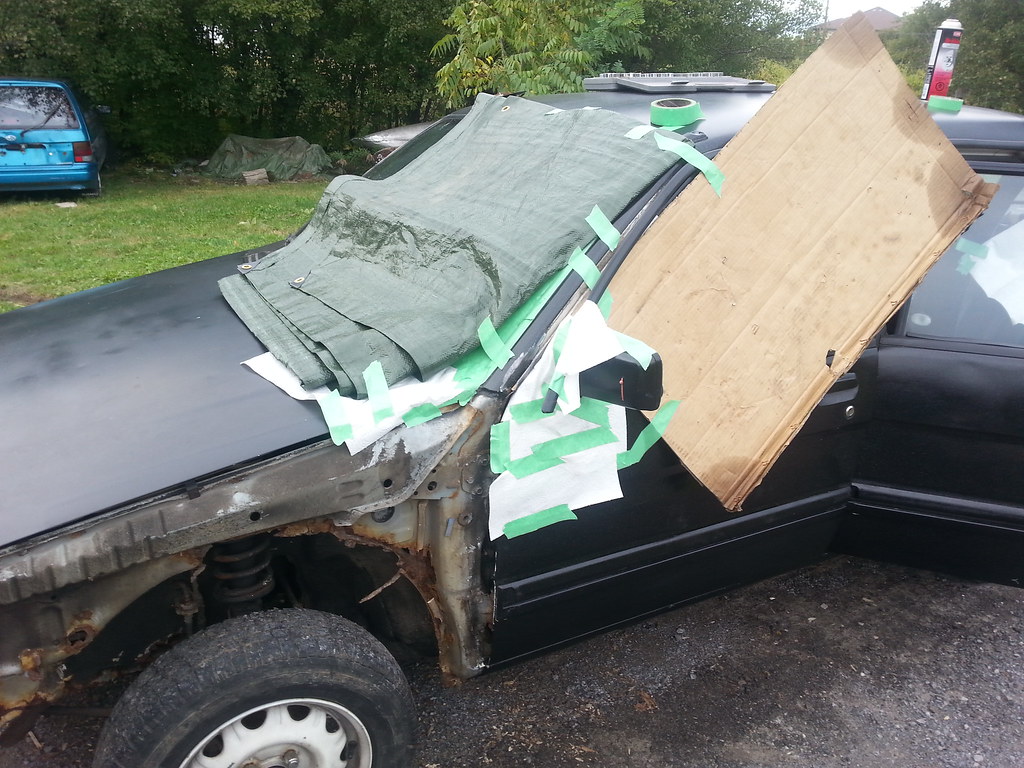 All done. When the paint has fully cured I'll glue the plastic drip rail back on at the bottom. 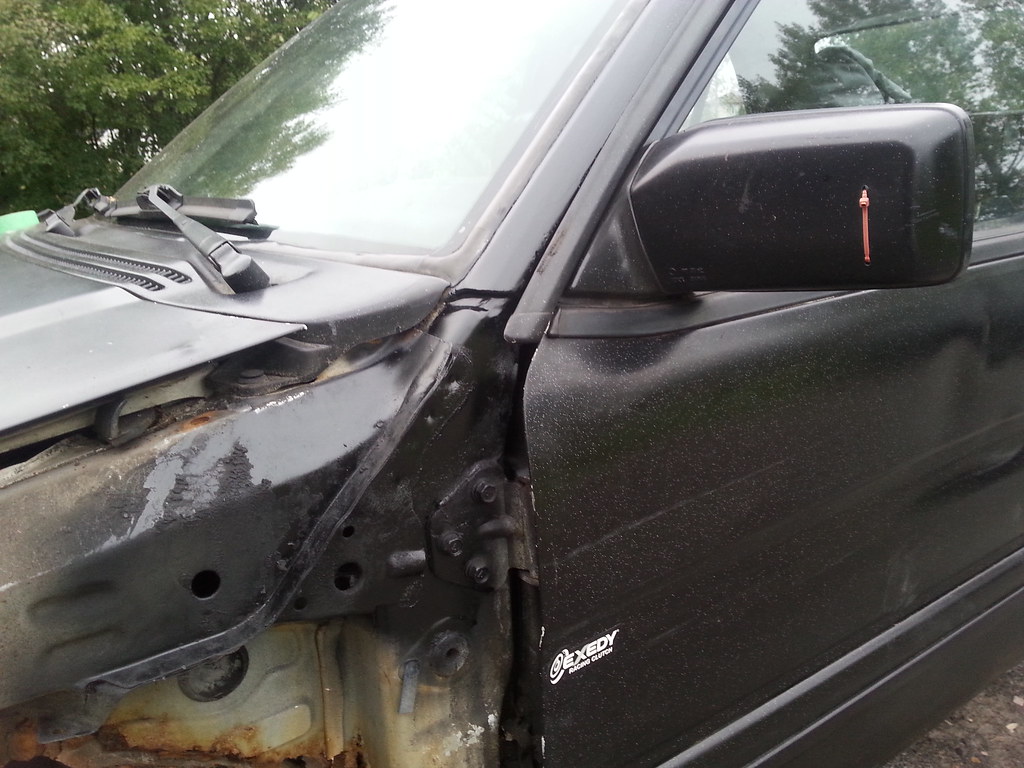 Got the front p/s fender off, and hammered out the main dent it had. Did some grinding to expose some surface rust on the top half and the main rust in the arch. 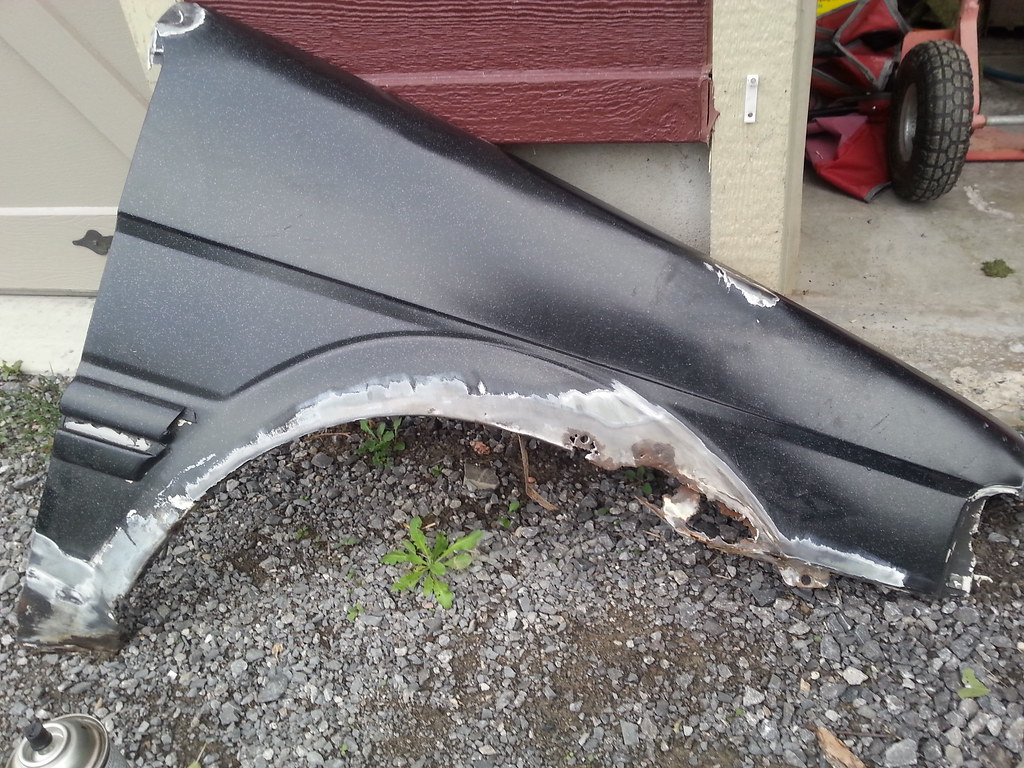 Primed the surface rust areas after removing the rust itself. No pic, but it was also painted black after this. 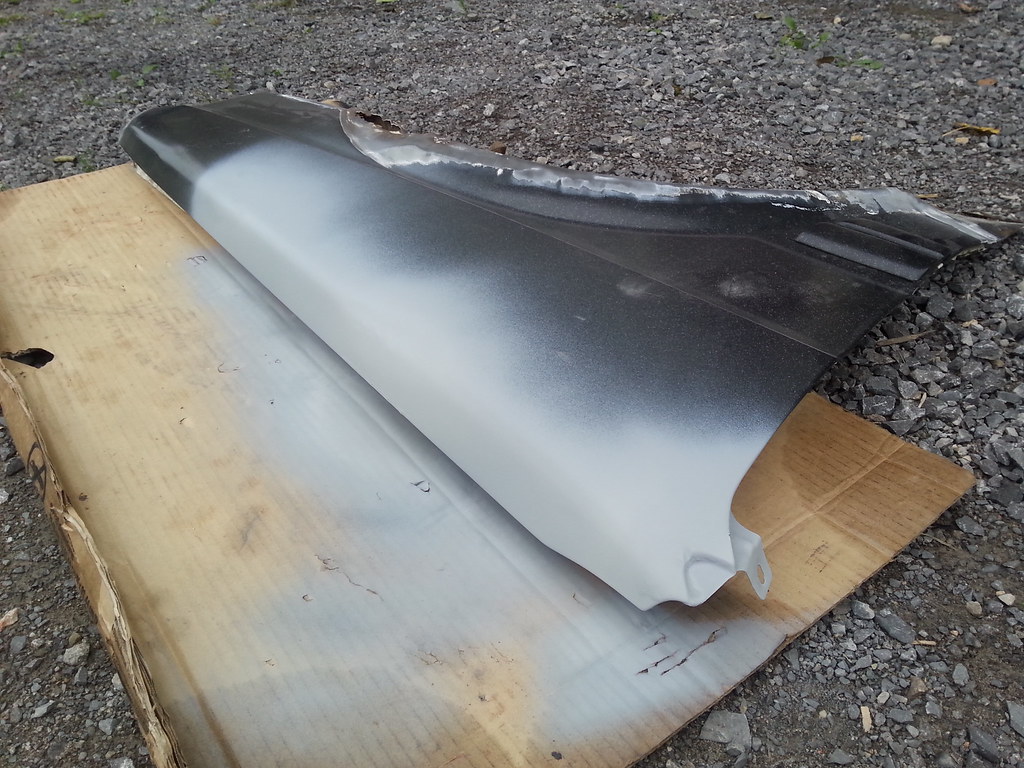 My next task will be to patch the d/s front apron, and paint it as well. Picked up some weld-thru primer today. 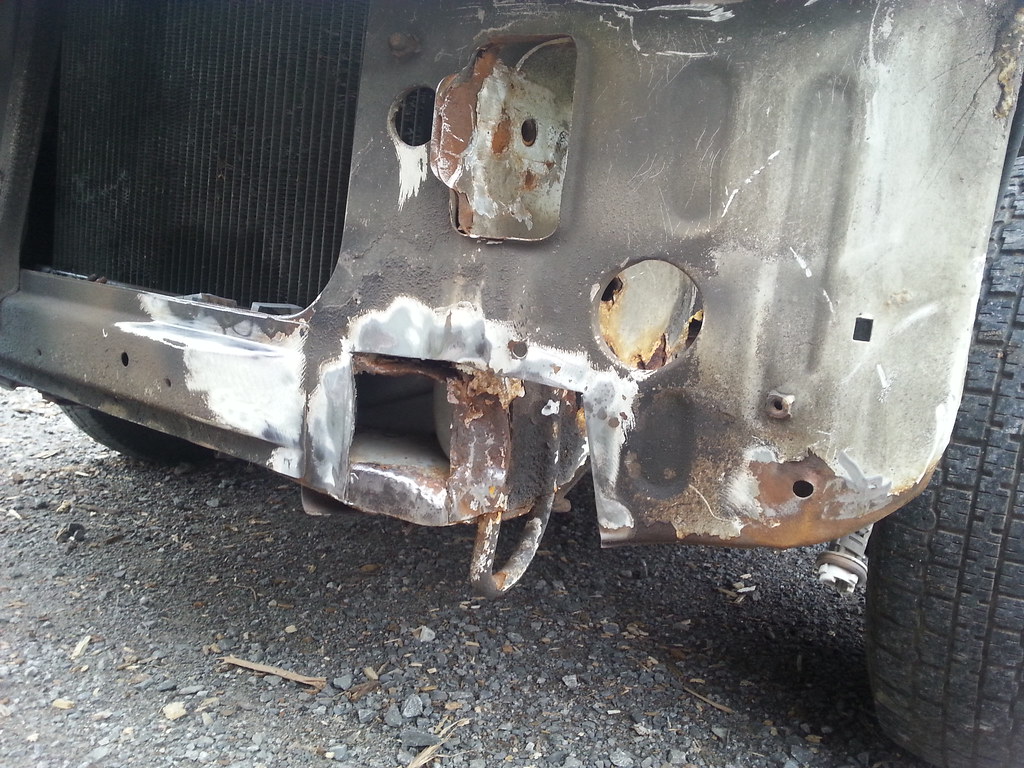 Rear brake bits also arrived today, so I'll be installing that before too long. Will need to rob the ebrake cable off another of the cars too, that'll be fun.  |
|
|
|
Post by noll11 on Sept 28, 2018 18:36:45 GMT -5
Made some progress today with the front apron repair. Not all fully welded yet, the strip on the right is just tacked on for now. I've decided that with the amount of welding this car needs, I need to bite the bullet and buy a gas bottle and some .023 wire instead of the .030 flux-core I'm currently using. As-is, it's nearly impossible to get a good spot weld, most (as can be seen in pic) are either too cold or burn right through. I've had the chance to do proper gas welding at a college course I did this past spring, so that makes the decision even easier. Will be picking up a bottle etc over the next couple days.
|
|
|
|
Post by noll11 on Sept 30, 2018 14:35:56 GMT -5
Cut some bits out of the other justy fenders I have, and after a lot of cutting, grinding, and tacking, have a pair of fenders that are roughly rust-free again. Still a lot of little stuff to do, and I won't fully weld the new bits on until I get the gas bottle, but they look like fenders again which is nice.
|
|
|
|
Post by noll11 on Oct 1, 2018 14:57:16 GMT -5
Got the rear hatch swapped today. relatively simple for the most part, but running the wires/washer fluid line thru a cavity with no access holes was a pain. Still, it's done now! 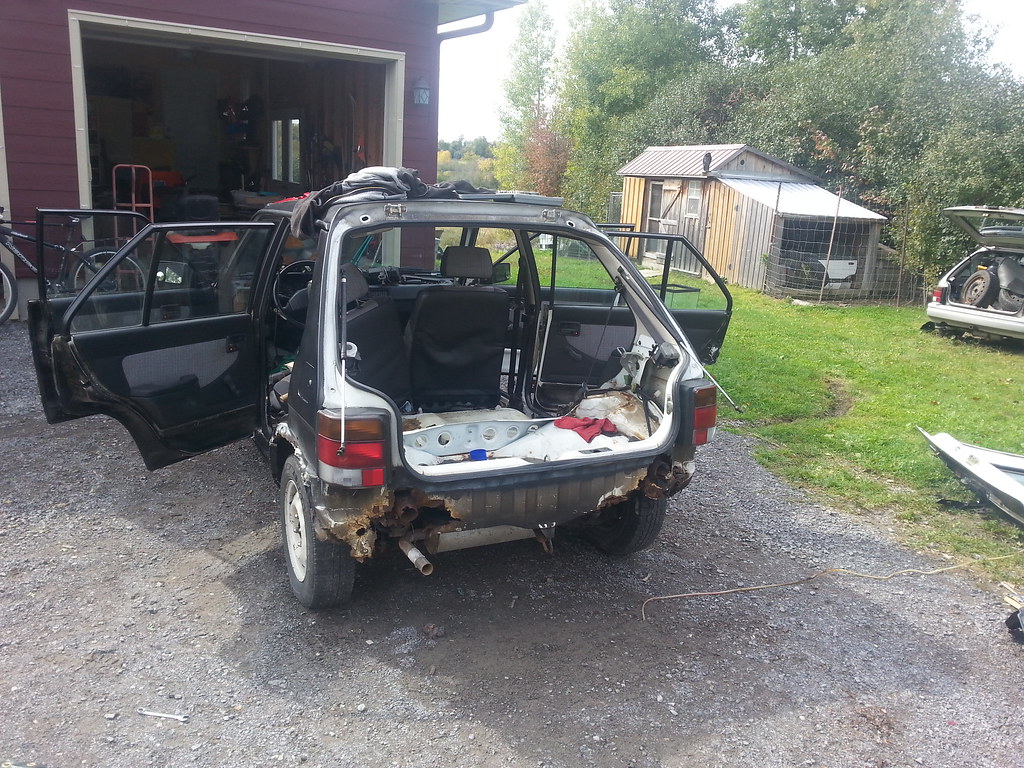 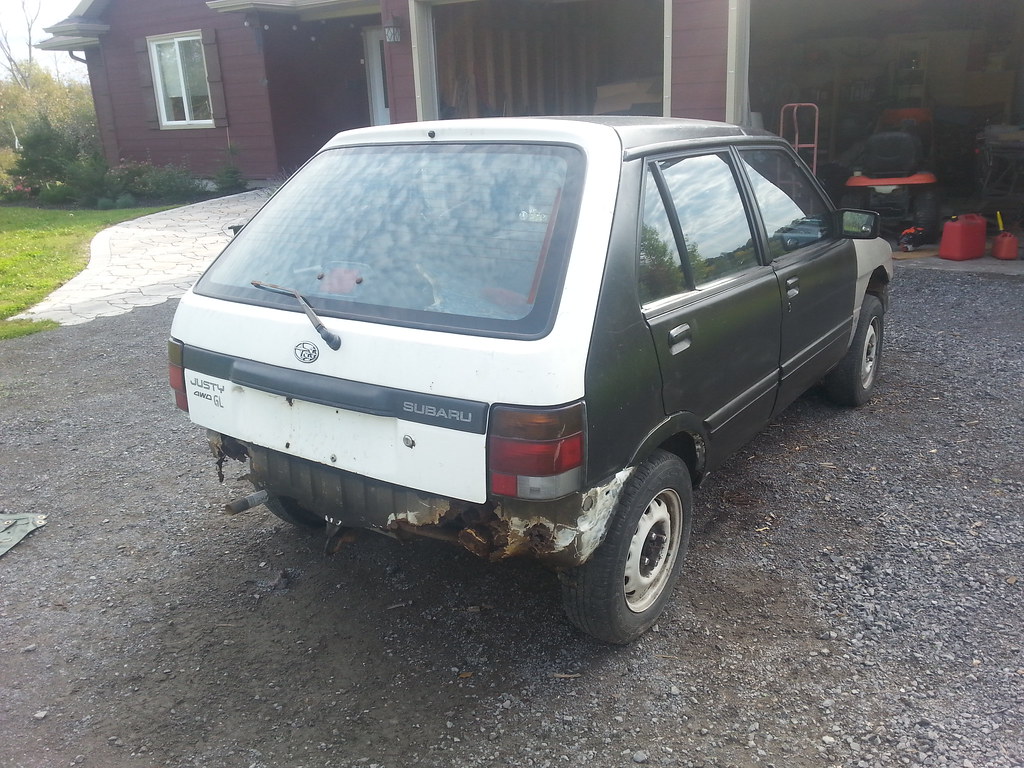 While removing the rear seats I found that the rear seatbelt mounts on both sides need work. This occurred when I tried to unbolt the mount on one side. Should be a straightforward repair, but another thing on the list of stuff to do. 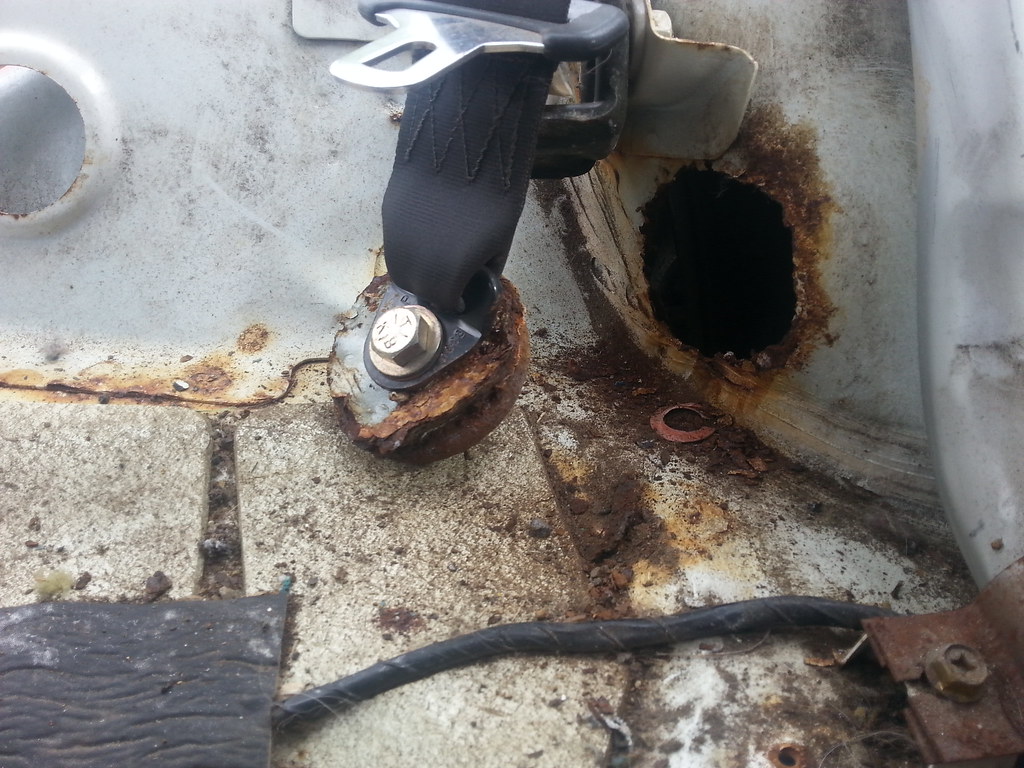 |
|
|
|
Post by noll11 on Oct 2, 2018 14:45:37 GMT -5
Got the car started today. Fired up nicely once I got a functional battery in it, after cranking for a bit. I will need to sort the high idle, as it's currently sitting around 2200rpm. Google told me the location of the idle screw, so that's the next thing to do.
|
|
|
|
Post by noll11 on Oct 2, 2018 15:28:08 GMT -5
High idle is sorted, purring nicely at 1000rpm now.
|
|
|
|
Post by noll11 on Oct 3, 2018 10:58:04 GMT -5
Figured I should make a full to-do list:
ENGINE BAY
-clean up wiring, remove errant grounds etc
-fix 4wd wiring
-degrease
-rad mount/swap
-engine bay rust (battery area)
-Valve cover gasket
-change fluids
-strut top mount
INTERIOR
-p/s floor minor rust repair
-shifter area rust repair
-driver's floor rust repair
-spare tire well rust repair
-paint
-rear seatbelt mount area repair
- find carpet, put different driver's seat in (possibly just swap seat rails for driver/pass)
-power for fm transmitter, phone, dashcam, etc
-cupholder
-fix trim pieces
-paint bottom of p/s door black
-Swap shifter for working button one
EXTERIOR
-front inner arch rust repair
-finish front fenders
-rear arch rust repair
-rear bumper area rust repair
-swap rear bumper from another car
-aluminum cover for fuel pump
-new front wipers
-front fog light mounts and wiring
-under-door rust cleaning
-rear brake rebuild + brake lines
-parking brake cable install
-check front brakes
-swap tires
-get alignment front/rear
-front bumper turn signals
-remount front bumper
|
|
|
|
Post by noll11 on Oct 3, 2018 17:30:33 GMT -5
Today's progress. designed and 3d-printed some inserts for the rear hatch, and installed them. Now I can bolt on a license plate when that time comes. Didn't bother being very careful with the glue as it'll be hidden by the plate and I'll need to take it all apart next spring to do rust repair there as can be seen at the top left. 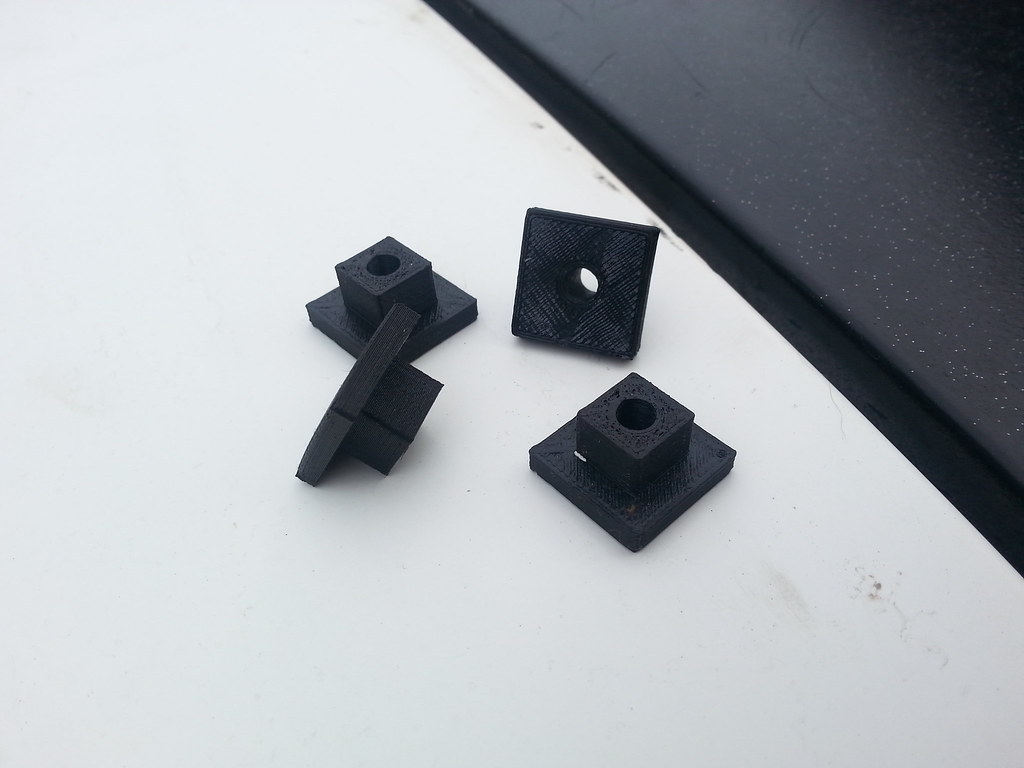 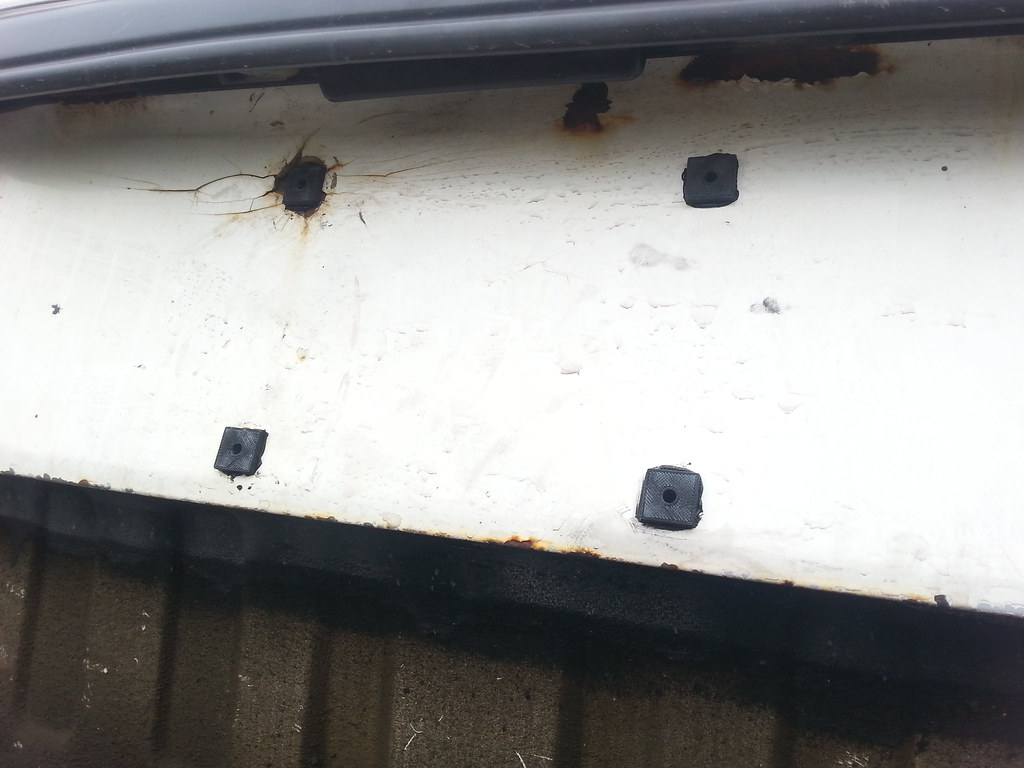 Also swapped the mirrors for a set off a parts-car. They were both ziptied and taped together, with busted adjuster mechanisms. 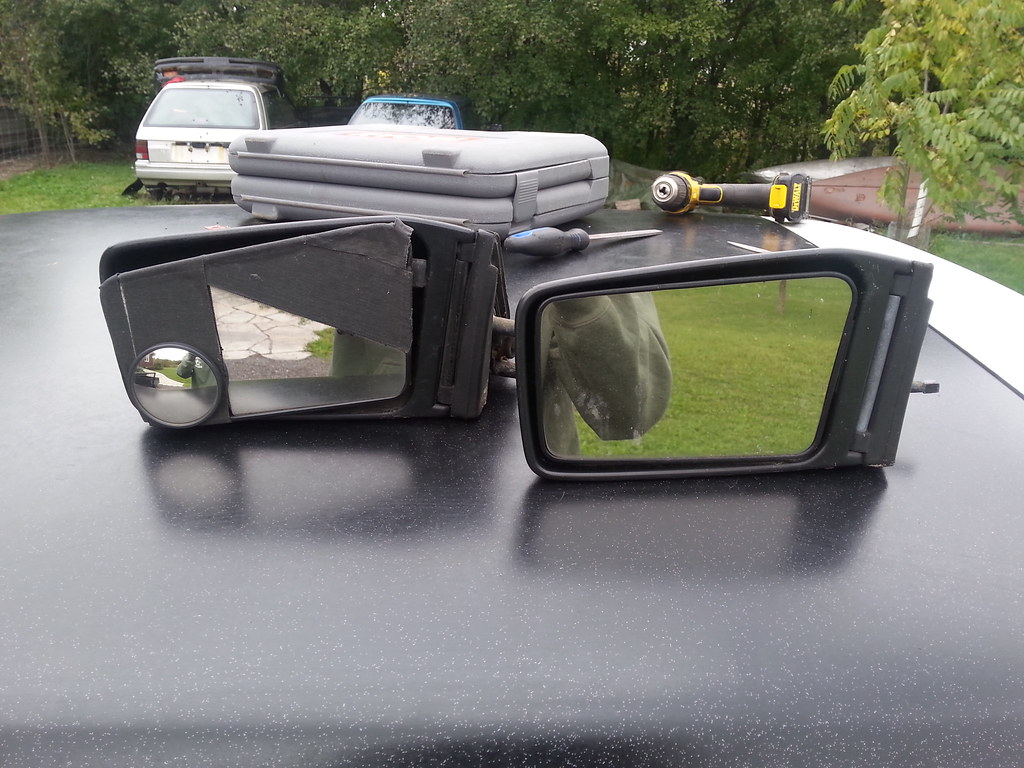 Much better.  |
|
|
|
Post by noll11 on Oct 4, 2018 18:52:30 GMT -5
Got the justy into the garage after doing some organizing. Should be much better for when I start doing gas-shielded MIG, and it's nicely out of the elements for other work too. Feat. My Lada Niva in the background. 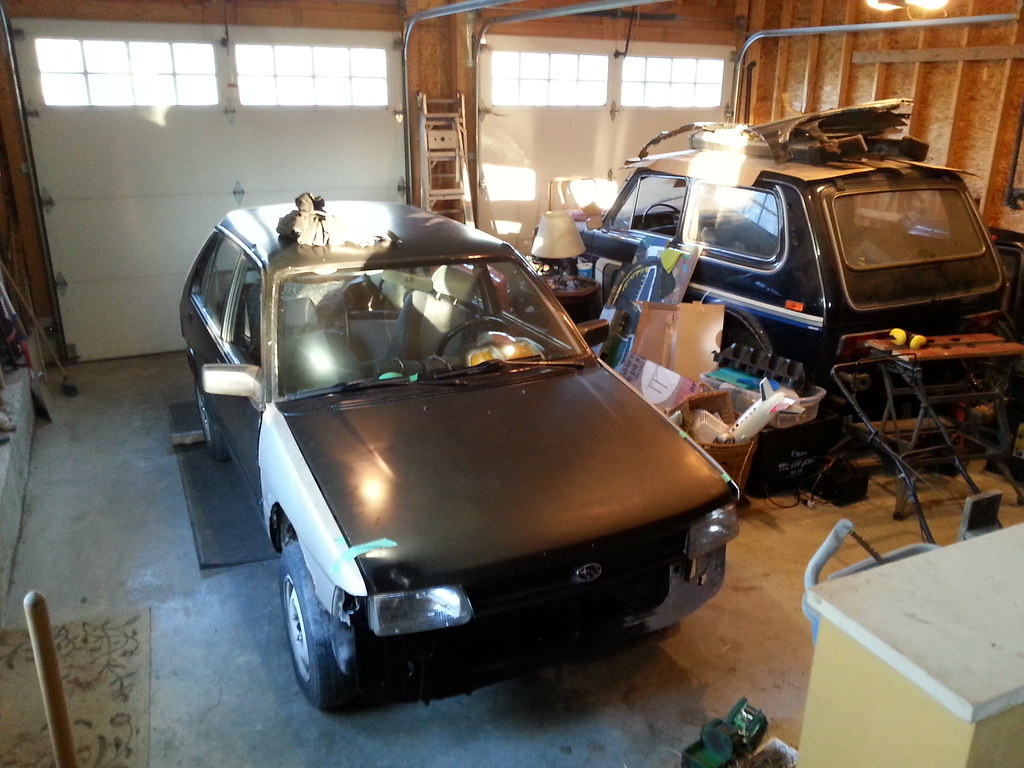 Dug this out of the engine bay; was being used as a ground lead. Replaced with an actual ground wire off a parts-car. 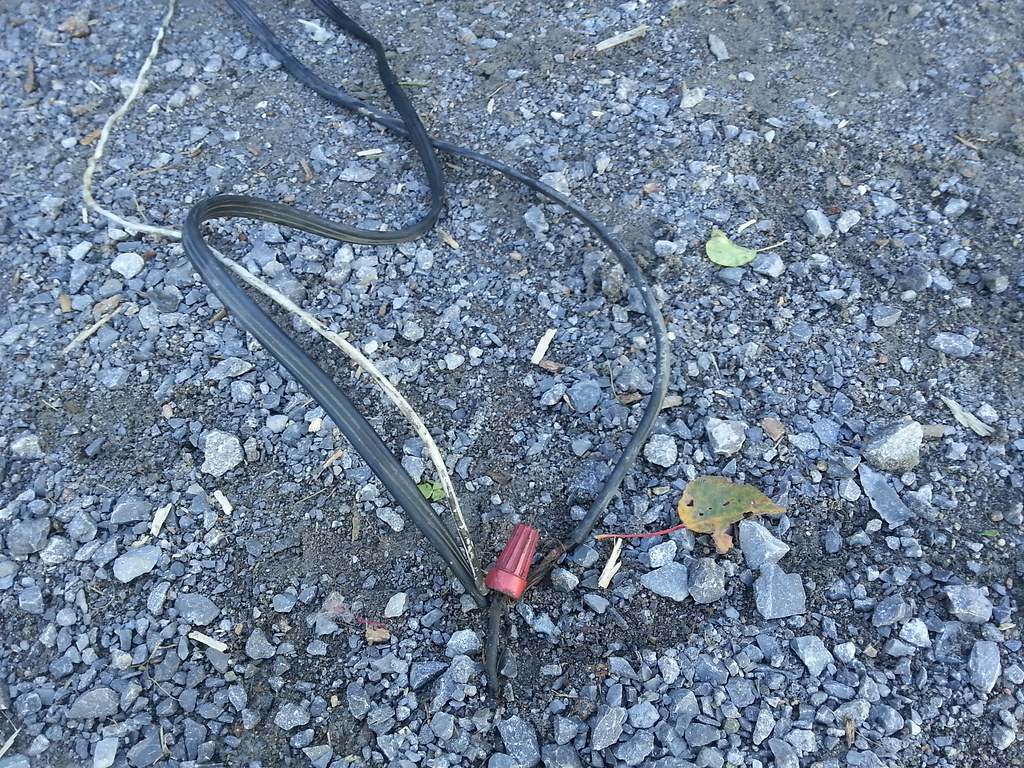 I'm also going to need to deal with the fact that there's a trailer wiring harness spliced in by the distributor for some reason. Probably going to cut that bit of harness out of a parts-car and solder in like the radio. 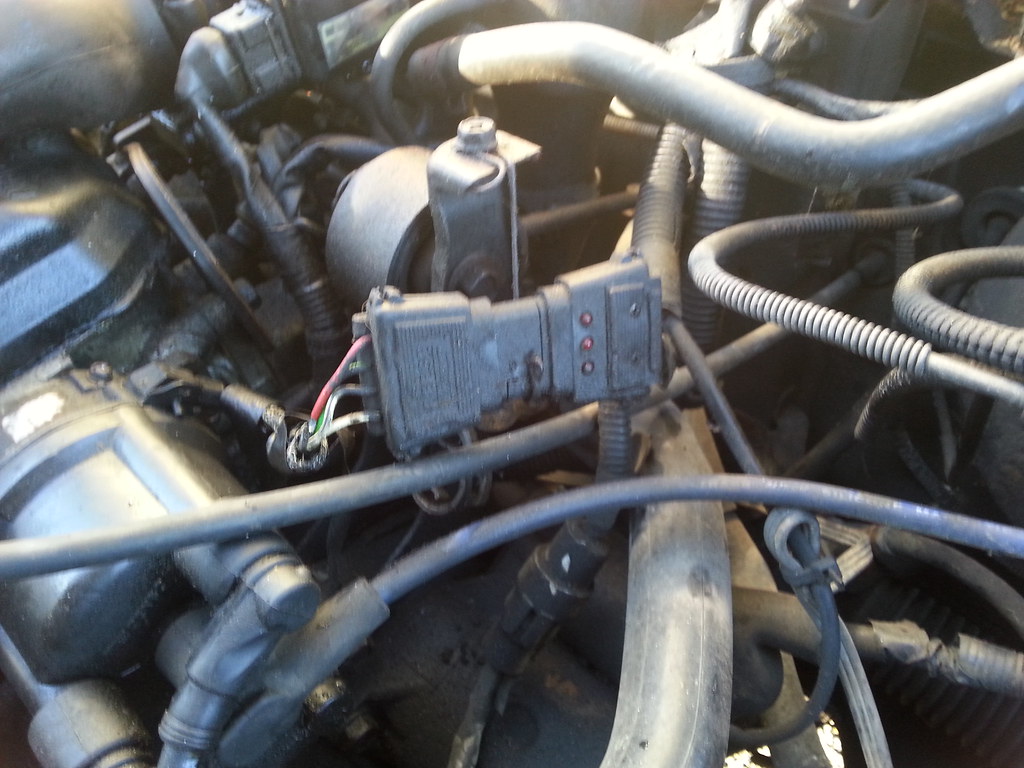 Also got some more goodies from Rockauto. Valve cover no longer dripping on hot exhaust will be nice. This is without a doubt the smallest oil filter I've ever seen, can't be much bigger than the one on our riding lawnmower. 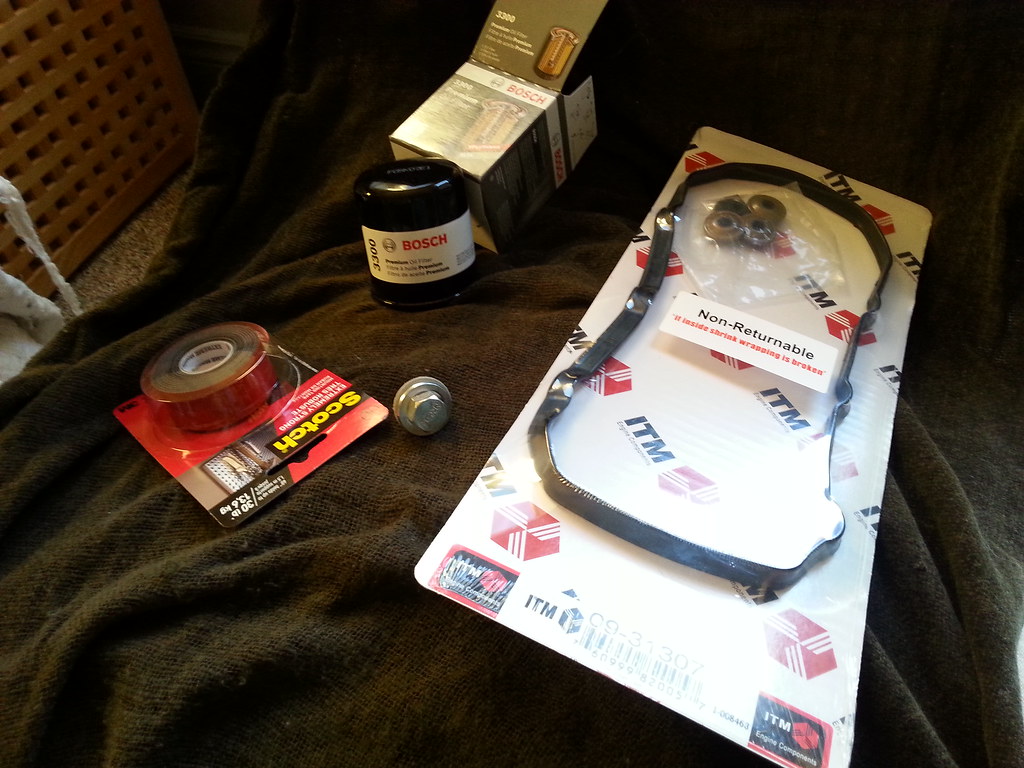 |
|
|
|
Post by noll11 on Oct 5, 2018 18:55:45 GMT -5
Not a huge amount of actual progress today, but went and got a bottle of inert welding gas, 0.023 wire, and correct sized tips. After some trial and error, (and figuring out how to properly swap the bus bar to set my welder to gas-welding), everything is working, and very nicely. Plan for tomorrow is to weld up all the stuff I've previously tacked together, change the valve cover gasket, sort some engine-bay electrical stuff, and maybe start welding some new bits if time allows.
|
|


 Is your car an ecvt?