|
|
Post by gearheadeh on May 24, 2013 15:30:46 GMT -5
Off the top of my head: the Oil and the Antifreeze ;D
|
|
|
|
Post by blacklight on Jun 11, 2013 1:51:48 GMT -5
Hi all! Sorry I haven't posted for a while, I've had a lot going on + family businesses that aren't really over yet. I can now proudly present myself here as Head of PR-matters in the Swedish Subaru Club (or SSC).  About my project: I'm gonna get the driver side door ready today and hopefully get it mounted and also jam the fuel pump bracket in there too. Have a nice day! //Magnus. |
|
|
|
Post by hashim5003 on Jun 11, 2013 12:30:52 GMT -5
Pictures would be appericiated.....
|
|
Danimal
 Getting my two Justys back together after a Justy hiatus.
Posts: 589 
|
Post by Danimal on Jun 15, 2013 11:03:40 GMT -5
Great work, Magnus! & Well done on the valve cover.
Have you the torque specification for the crankcase cover bolts? I thought I knew where to find this and now I need it, cannot put my finger on it.
Thanks,
Danimal
|
|
|
|
Post by blacklight on Jun 19, 2013 13:14:23 GMT -5
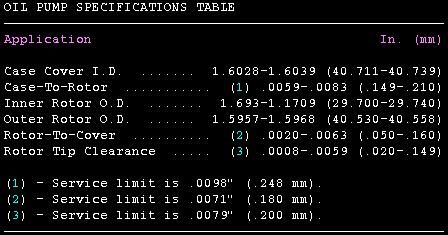
Hi Danimal. Sorry for long time - no answer. Sorry, no. I have not. I saw your post in an other thread, and I put my hopes to that Terry find's em. As for my project... The oil-pump-guy needs the following specs: -original (unused) oil pump shaft bore diameter. -original (unused) oil pump shaft diameter. -required clearances between the two. He needs these in order to make a new bushing for the shaft. |
|
|
|
Post by Armageddous on Jun 19, 2013 20:36:51 GMT -5
 Tada. Terry |
|
|
|
Post by blacklight on Jun 22, 2013 3:15:38 GMT -5
Terry, you're the man!
The oil pump-guy however, given the measurements he made, claims a new-spec rotor shaft will do. He/we can easily manufacture this from hardened steel,
but I doubt this will solve the fact that the cover is worn from the shaft. :/
Ideas?
Gonna install my "new" fuel pump plate today, and hopefully also my driver's side door.
//Magnus.
|
|
|
|
Post by Armageddous on Jun 22, 2013 15:12:45 GMT -5
The new inner rotor that I have here for you (Check your messages btw) has the shaft included. You don't buy them separately.
Terry
|
|
|
|
Post by blacklight on Aug 9, 2013 14:11:34 GMT -5
Right... Since I'm almost out of time, the old oil pump have gone back in. Sorry. Though, this have enabled me continue the assembly of the engine. Today, I did the following: -Re-torqued the crank bolts to 45 nm and 40 for the rod bolts. -Applied some flange-sealant to the chain tensioner. -Installed the crankcase cover with flange sealant on both sides of the gasket. (Note 1) -Installed the water pump, again, with flange sealant on both sides of the gasket. -Cleaned a bunch of stuff, amongst other things, the cam belt covers. -Installed the inner cam belt cover. -Installed the cam belt tensioner. -Installed the cam belt. -Installed the alternator. Will prepare the intake manifold for installation tomorrow. Just gonna flat out the gasket facing and perhaps some cleaning of the carb seat. Note 1: I repeated Armageddous mod, namely the plug shown here: subarujusty.proboards.com/thread/3590/1st-gen-efi-swap?page=2 I made it in my fathers metal lathe, and added a M6 thread to it for easy removal. No pics for today, though, sorry. May be tomorrow. //Magnus. |
|
|
|
Post by blacklight on Aug 10, 2013 20:31:59 GMT -5
Progress:    Re-did some wiring on the engine harness, among other things, I re-joined the wires for the temp sensor with some soldering and some "shrink-hose" (word?) and made most of the engine ready for re-installation with the gearbox. The engine still hangs on it's stand, so I haven't been able to fit the rear crank seal (clutch side). Also, this have prevented me from cleaning oil from the engines bellhousing. May do this tomorrow, as I plan to install the flywheel, clutch, and finally joining the gearbox. Also, neighbors dog Beda (black lab) says HAI!   |
|
|
|
Post by Armageddous on Aug 11, 2013 22:40:18 GMT -5
In retrospect that oil pump mod was sort of a bad idea. I have since gone back to a normal cover with no hole in it, as the other one started leaking. The word you're going for is heat-shrink btw Terry |
|
|
|
Post by blacklight on Aug 12, 2013 4:10:09 GMT -5
Terry: You couldn't seal it with some thread-lock and a lock-nut with a washer on the outside? All: Yesterday, I fitted the carburetor, made the connectors for it (6 wires to the carb), and I also managed to get the engine hanging in a home-made rig. I installed the new oil seal on the flywheel-side of the crank (properly lubing it with oil first, of course.) Today, I'm gonna install the flywheel and the clutch. May be difficult locking the crankshaft though... :/ Q: What would a "kind of" defective pilot bearing cause? Mine spins without noise, but it runs hard at 5 places in 2 turns. Hard to explain. Gonna see if I can get a new bearing, or if my new clutch came with one (re-using my old pressure plate, disc and release bearing). //Magnus |
|
|
|
Post by Armageddous on Aug 12, 2013 20:09:58 GMT -5
I epoxy'd it in and it didn't seal, I didn't try any harder then that. I just admitted defeat.
Bad pilot bearings make intermittent squealing noises, usually while the clutch is not engaged. Meaning, when the pedal is pushed in sitting at a light. Then as you take off the noise goes away, at least in my experience (an 88 Ranger with one that exploded)
Terry
|
|
|
|
Post by blacklight on Aug 14, 2013 17:56:04 GMT -5
Update-time! Got the engine+tranny into the vehicle body during monday.   Sure was a bear (see post very long time ago) to get the rear transmission mount in and also aligning the propeller shaft into the gearbox. Had 2 friends over to maneuver it at the engine bay with me lying under the car body to get the respective "bears" into place. Sorry for no update, but it's been almost euphoricaly intense to have it in and finally see an end to the project. I've almost finished hooking everything up and re-installing in the engine bay. Just need to crank the engine ½ turn to get the distributor arm changed. I've also figured out how to hook up my oil pressure gauge. Left to do: -Re-fill all fluids (engine oil, transmission oil, coolant) -Re-install fuel pump bracket. (Made new one from a butchered refrigerator door. Good sheet-steal.  ) -Finish charging battery. -Finish re-installing gear shifting linkage. -Install exhaust manifold and the rest of the exhaust system. -Change O2 sensor. (What color is the wire in the harness for this?) -Install spark plugs. -Adjust valve play -Set ignition timing. Trail-run. (Cooldown) -Re-torque cylinder head bolts. -Adjust valve play Sound good? Anything else that I may have forgotten? //Magnus. |
|
|
|
Post by blacklight on Aug 16, 2013 2:59:56 GMT -5
Yesterday, I brought the following:
Coolant: Ethylene-glycol, concentrated. (Will dilute to 50/50% mixture).
Transmission oil: Mineral-based 80W-90 API GL-5.
Spark plugs: BERU UX79. It has 4 electrodes, and the guy who sold em to me said they popped up
when he did a search in some program he had on his computer, so I guess it's not completely off.
Some new nuts for the exhaust manifold. I'm considering changing the pin-bolts too, but we'll see.
Got some new stainless hose clamps for the coolant hoses.
Q: Is it really necessary to renew the spring-pins for the CV-joints? Having a hard time to find new ones. :/
//Magnus.
|
|
|
|
Post by blacklight on Aug 16, 2013 12:32:08 GMT -5
Update: -I've installed both CV-joints to the gearbox and reinstalled the lower ball joints (spindle joints?) at the bottom of the suspension arm. -Finished installing the coolant hoses and added coolant. -Filled the engine with 10W-40 mineral oil. (Did I read somewhere something about "priming" the oil pump...?) -Installed the fuel pump bracket, with new filter. -Installed spark plugs. -Installed spark plug wires. -Finished installing gear shifting linkage. -Got the oil pressure gauge installed. Light not working though... :/ Will look into it. Problem: -The fuel pump doesn't "prime" like it normally does. ECU not getting power? -I have to extend the wires to the coolant sensor. -What does the 2 black wires on the engines harness do? I recon they are just ground wires, as I measure continuity between them and ground, even when they arn't hooked up, so I guess the current flows backwards (multimeter set on beep (diode-mode)). Ideas? Terry? //Magnus. |
|
|
|
Post by Armageddous on Aug 16, 2013 23:29:57 GMT -5
Well, for starters your transmission takes 75w90 GL-4, and I do not recommend multi-electrode spark plugs (Although you have installed them and now you probably can't take them back.) When dealing with replacement parts always try to match OE, single electrode copper core plug.
The roll-pins for the CVs are not required to be replaced, only recommended, they are hard to find. You can always put some blue loctite on the outside before you drive them in if you're concerned with them coming out.
Why did you have to extend the coolant sensor wires? Did you change something?
You will have to be more specific on the "black wires", I have no idea what you're talking about.
I'm pretty sure the carbureted Justy's don't prime the fuel until the engine is cranked, as the fuel pump is controlled by the Revolution Sensor, tho I could be wrong.
Terry
|
|
|
|
Post by blacklight on Aug 17, 2013 3:28:27 GMT -5
The coolant sensor wires was probably cut for some reason at some time, and since I had to reconfigure my harness to make the wires to the carb reach to the new connector, I had to repair and extend those wires. I used a big-sized cotter pin for the CV's, since I couldn't even find the old roll pins. Ok. Will take a pic of the 2 black wires. Well, it "primed" the carb before I started this project, so, with all respect, you're wrong on this one, Terry. Although I appreciate your wisdom. Q: How would one "prime" the oil pump? //Magnus. |
|
|
|
Post by blacklight on Aug 17, 2013 15:16:43 GMT -5
Terry: The black wires I'm referring to is located in section B7 in the following pic, just above the FCV solenoid. All others: The car started right up! I just needed to switch the two wires going to the distributor pickup and it started at like third compression. This was after I primed the carb a couple of times first, of course. Gonna make a small mod to the oil pressure gauge and after that, I'm probably gonna post some pics and perhaps a vid of it all. Had to remove the left rear wheel in order to loosen the drum, since it seems to have rusted stuck. :S May open the drum later to lube stuff up. Took it out for a trail run, just to exercise the brakes a little, and help remove air from the coolant system. //Magnus. |
|
|
|
Post by Armageddous on Aug 17, 2013 16:39:15 GMT -5
Damnit, I hate being wrong. Logic dictates that if it worked before and doesn't now, it's probably your fault. Check all your connections and fuses. In order to prime the oil pump you basically have to take it out and lube it up with assembly lube or vaseline (something thicker then engine oil) and put it back together shortly before you start the engine. The other option is to disable the fuel system and crank the engine over until your oil pressure gauge shows pressure. It will show around 5 - 10psi. I sent your new pump, btw, check your PM's. Terry |
|


 )
) Is your car an ecvt?